logo website
  • Home
  • Features
  • Templates
  • Pricing
  • Docs
  • Install App
Menu
  • Home
  • Features
  • Templates
  • Pricing
  • Docs
  • Install App

Getting Started

1
  • Introduction

Quick Start

1
  • Create a new form

Display & Placement

5
  • Theme integration
  • Get embed form ID of a form
  • Display a form on Shopify front store
  • Display a form on a specific page
  • Add a form with app block

App Integration

2
  • Google reCAPTCHA Integration
  • hCaptcha integration

Mail Notification

4
  • Admin email notification
  • Customer email notification
  • SMTP Setup
  • Mail API setup

Data, Insights & Management

5
  • Check submissions data
  • View Insight of the Form
  • Export submissions data
  • Export and import forms
  • Disable saving submission data for forms
View Categories

SMTP Setup

5 min read

How to Configure SMTP Setup in Viformy #

SMTP Setup allows your store to choose a custom email provider for sending form notification emails, including admin notification emails, customer auto-response emails, and test emails.

By default, Viformy uses the Viformy email provider. If you want to send emails through your own email account or email service, you can add an SMTP provider in the email configuration.

Step 1: Open SMTP Setup #

There are two places where you can find SMTP configuration in Viformy.

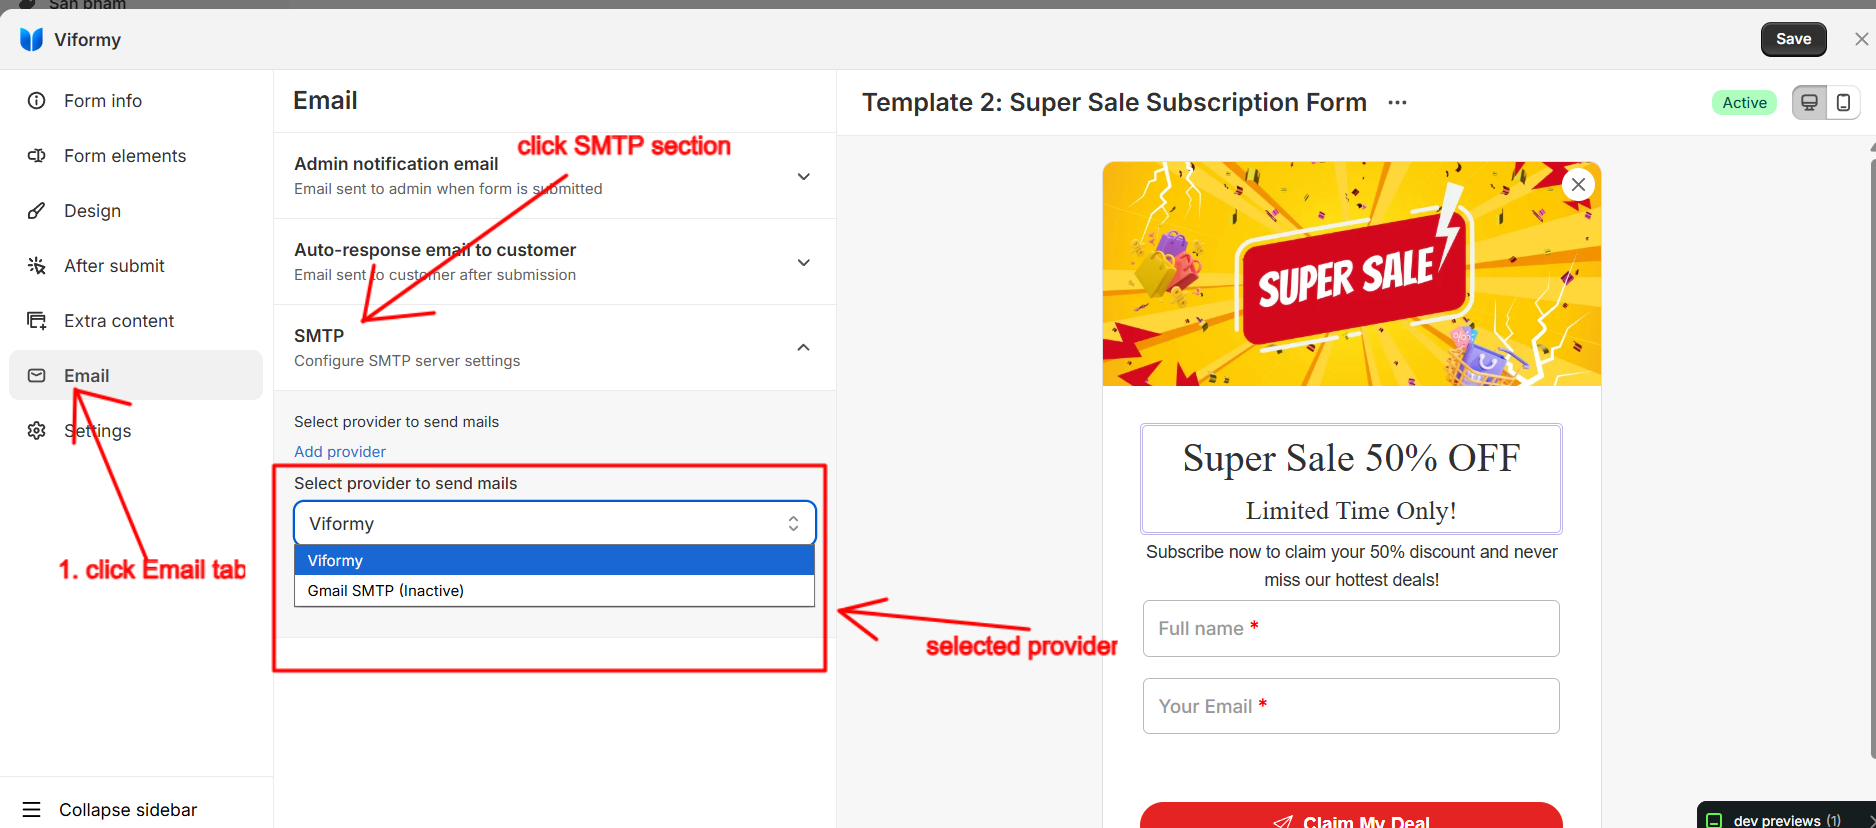
1. In Form Builder

Open the form you want to configure, select the Email tab from the left sidebar, then open the SMTP section.

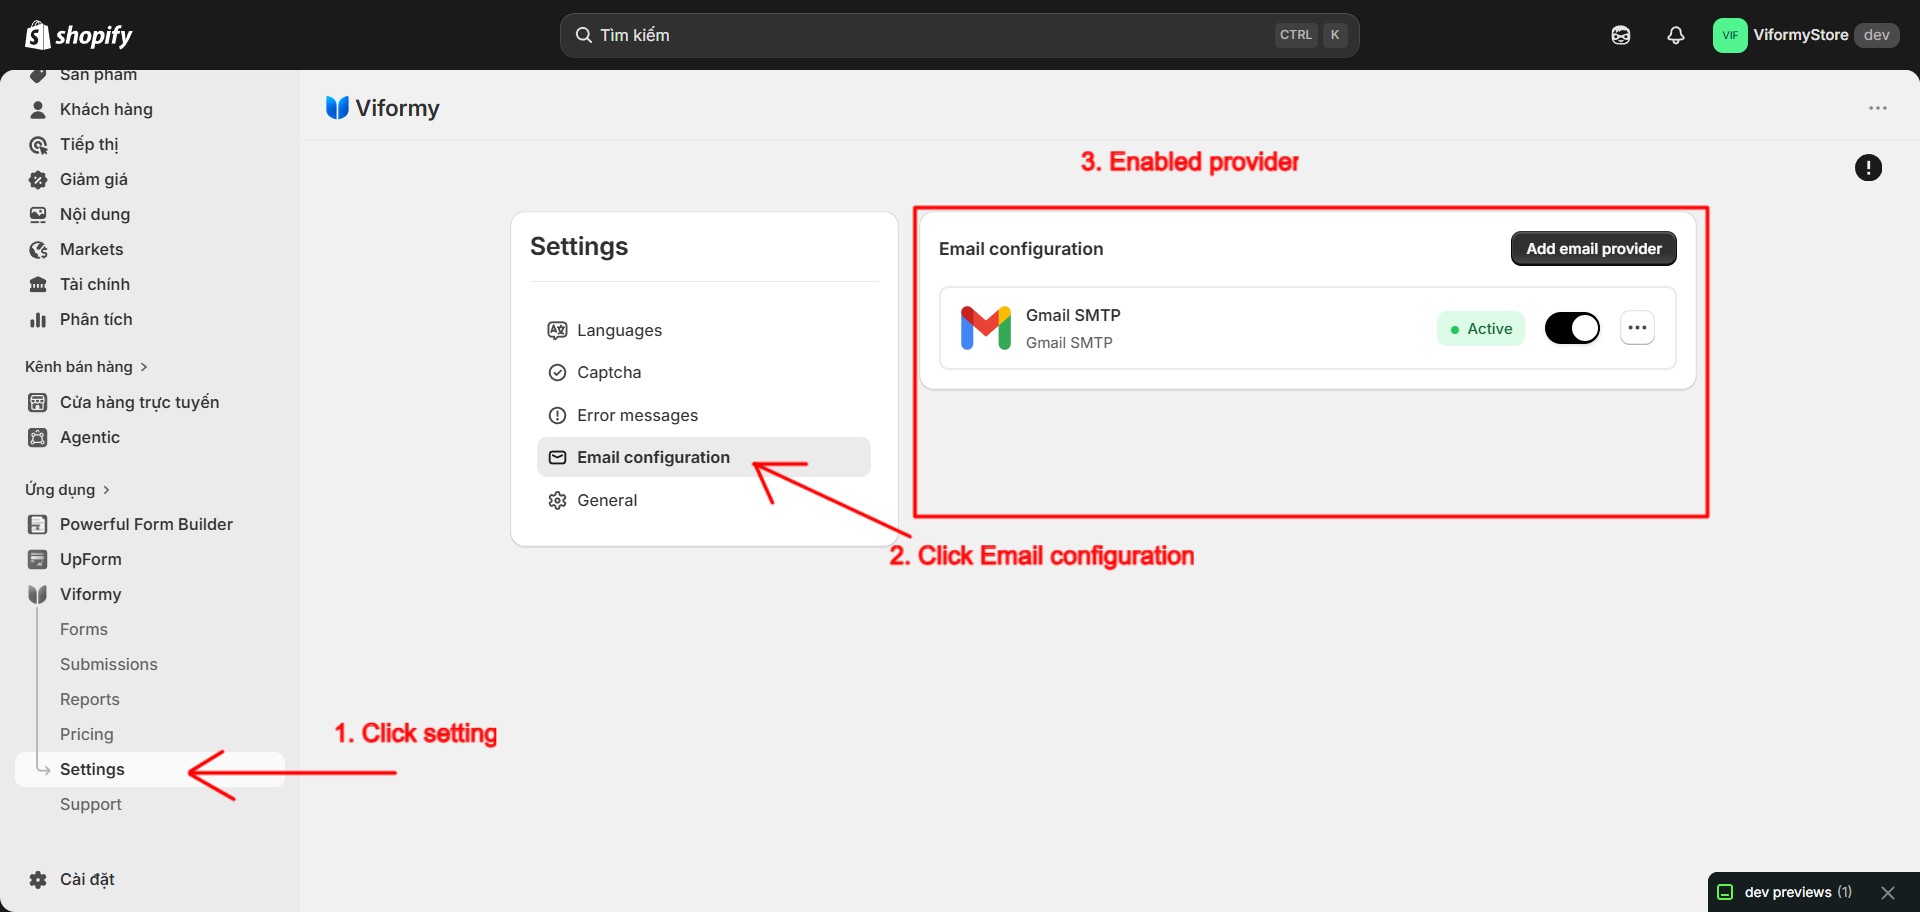
2. In App Settings

Go to the app Settings page and open Email configuration. From there, you can add, edit, enable, disable, test, or delete email providers.

In Form Builder, the SMTP section is used to select which provider will send emails for the current form.

smtp setup 1

smtp setup 2

Step 2: Select an Email Provider #

In the SMTP section, you will see the dropdown Select provider to send mails.

The default provider is:

Viformy

If you have added custom providers, they will appear in the list, for example:

My Gmail SMTP (Active)
My SendGrid (Active)

After selecting a provider, the form will use that provider to send notification emails.

Step 3: Add a New Email Provider #

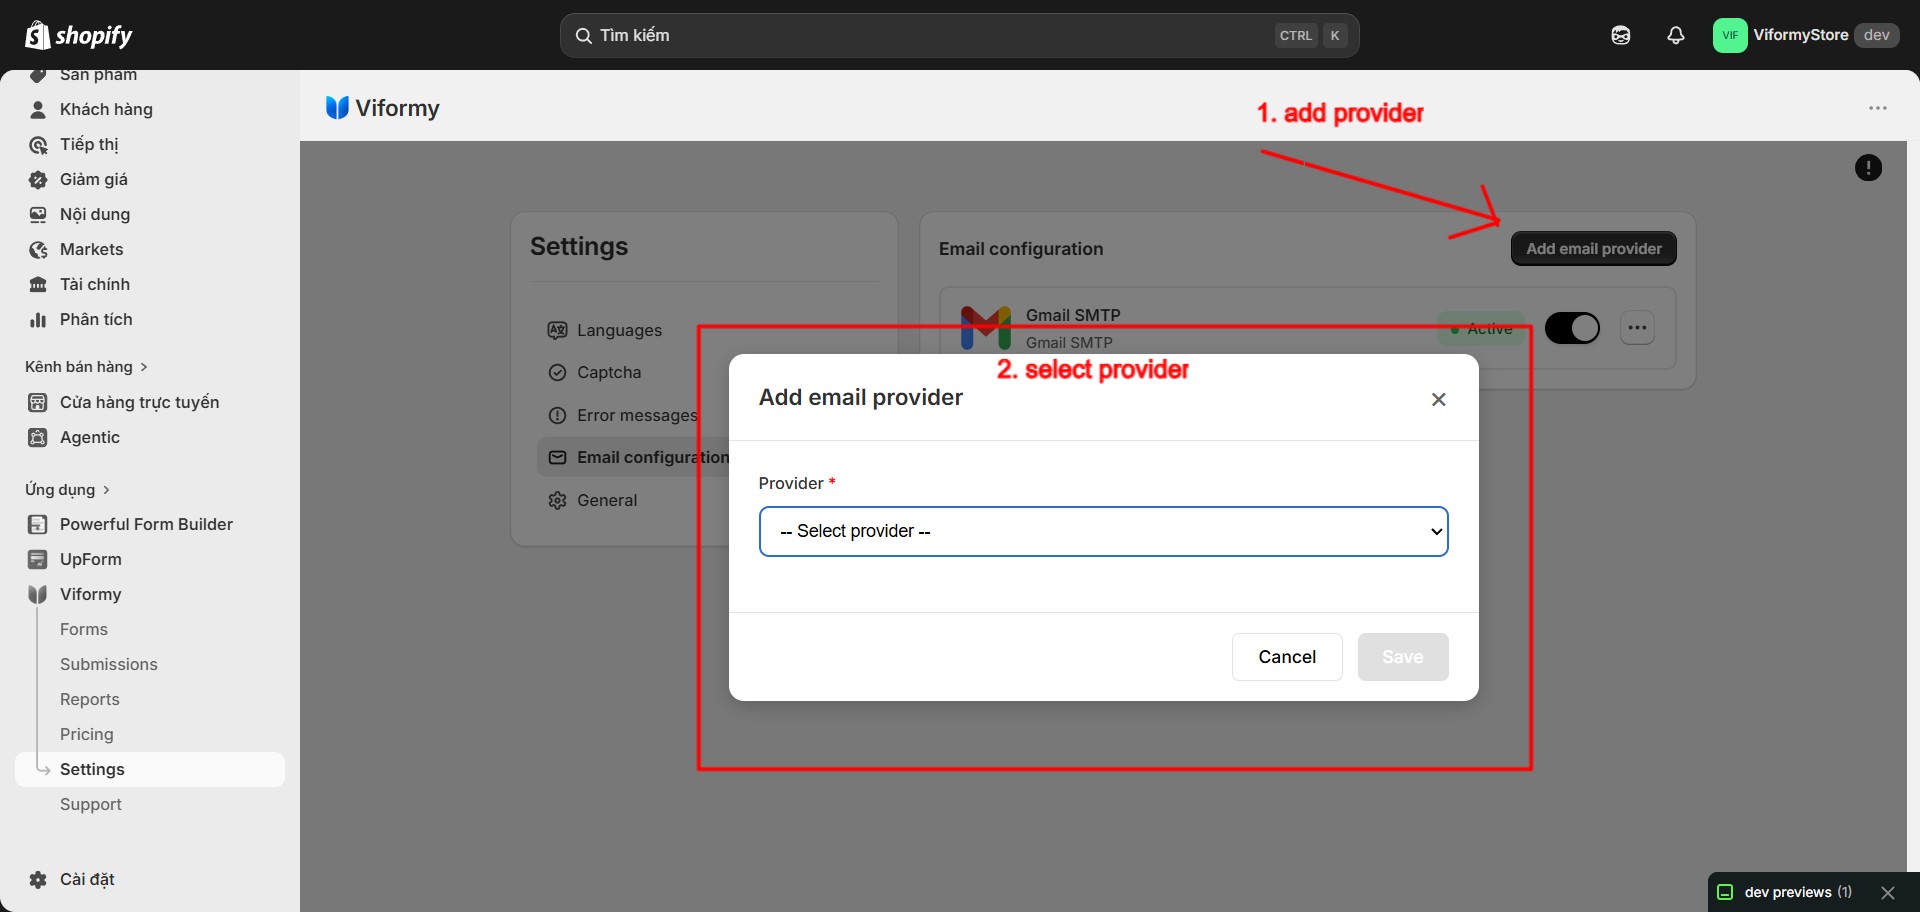
In the SMTP section, click Add provider. A popup named Add email provider will open.

You can choose one of the supported providers:

  • Brevo
  • Mailjet
  • Twilio SendGrid
  • Amazon
  • Gmail SMTP

After selecting a provider, Viformy will show the configuration fields required for that provider.

smtp setup 3

Gmail SMTP Configuration #

Select provider:

Gmail SMTP

Required fields:

  • Your Gmail email address
  • App password
  • Title
  • Active

Viformy uses these fixed SMTP settings for Gmail:

Host: smtp.gmail.com
Port: 587
Encryption: TLS or SSL
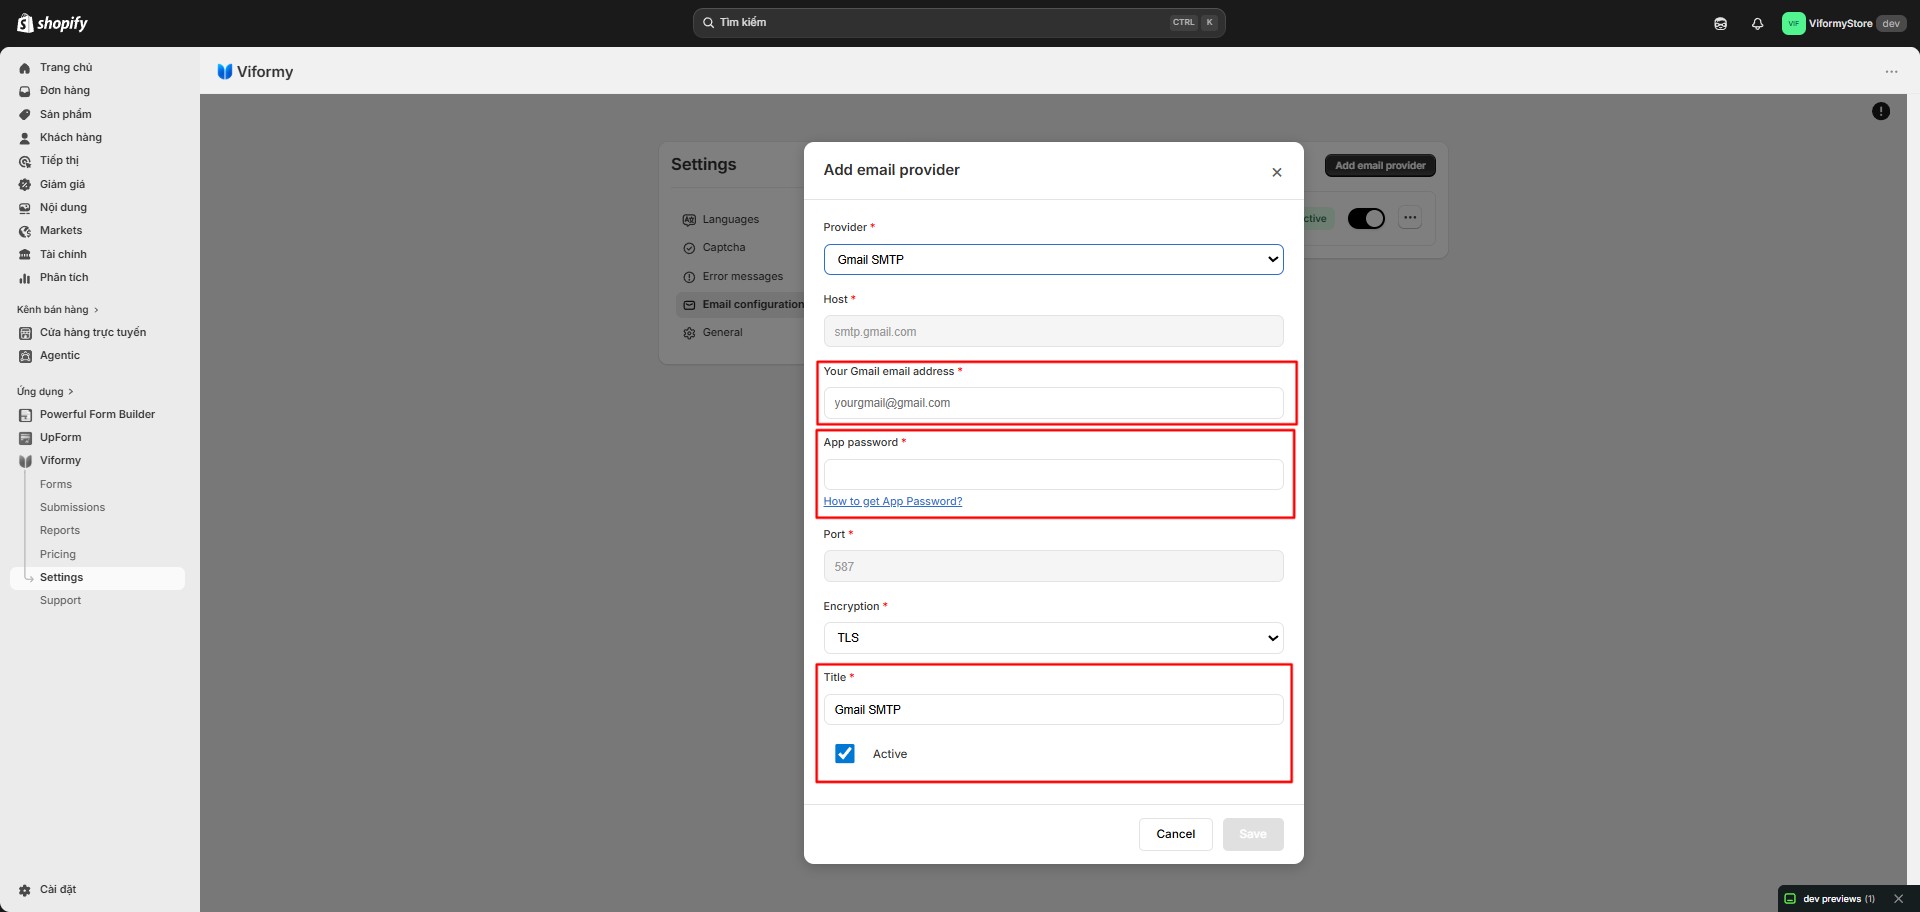
Note: Gmail usually requires 2-Step Verification before you can create an App Password. Use the Gmail App Password, not your normal Gmail login password.

smtp setup 4

Brevo Configuration #

Select provider:

Brevo

Required fields:

  • SMTP Username
  • SMTP Password
  • Sender email
  • Sender name
  • Title
  • Active

Viformy sends Brevo emails using:

Host: smtp-relay.brevo.com
Port: 587

Mailjet Configuration #

Select provider:

Mailjet

Required fields:

  • API Key
  • Secret Key
  • Sender email
  • Sender name
  • Title
  • Active

When sending emails, Viformy uses Mailjet SMTP through port 587.

Twilio SendGrid Configuration #

Select provider:

Twilio SendGrid

Required fields:

  • API Key
  • Sender email
  • Sender name
  • Title
  • Active

Important: The sender email must be verified in SendGrid Sender Identity. If it is not verified, test emails or real emails may fail.

Amazon SES Configuration #

Select provider:

Amazon

Required fields:

  • API key ID
  • API key
  • Region
  • Sender email
  • Sender name
  • Title
  • Active

Example regions include us-east-1, us-west-2, eu-west-1, and ap-southeast-1.

Note: AWS SES may be in Sandbox Mode by default. In sandbox mode, you can only send emails to verified email addresses or domains. To send emails to real customers, request production access in AWS.

Step 4: Save the Provider #

After filling in the required information, click Save.

When you save, Viformy will check the required fields and send a test email to verify the configuration. If the test is successful, the provider will be saved and shown in the provider list.

If the test fails, the provider will not be saved. Viformy will show an error so you can check the provider information again.

smtp setup 5

Step 5: Select the Provider for a Form #
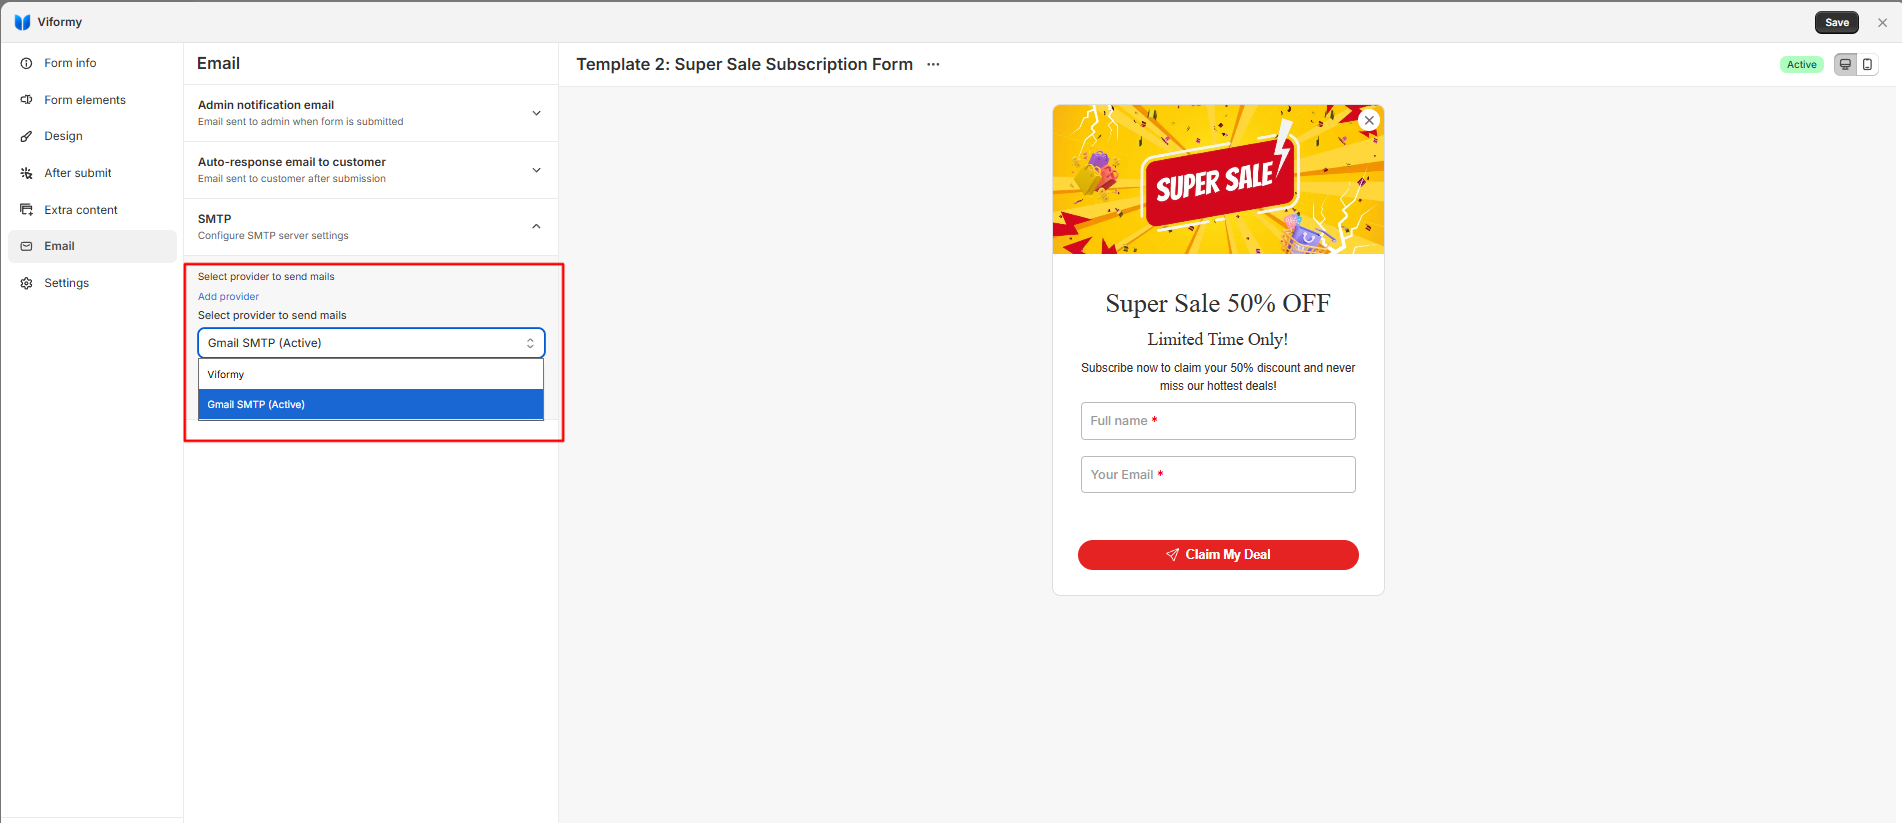
After a provider has been added, open the form that should use it. Go to the Email tab, open SMTP, and select the provider from Select provider to send mails.

Email settings are saved automatically for the form. From this point, Admin notification and Customer auto-response emails will use the selected provider.

smtp setup 6

Step 6: Test SMTP in the Form #

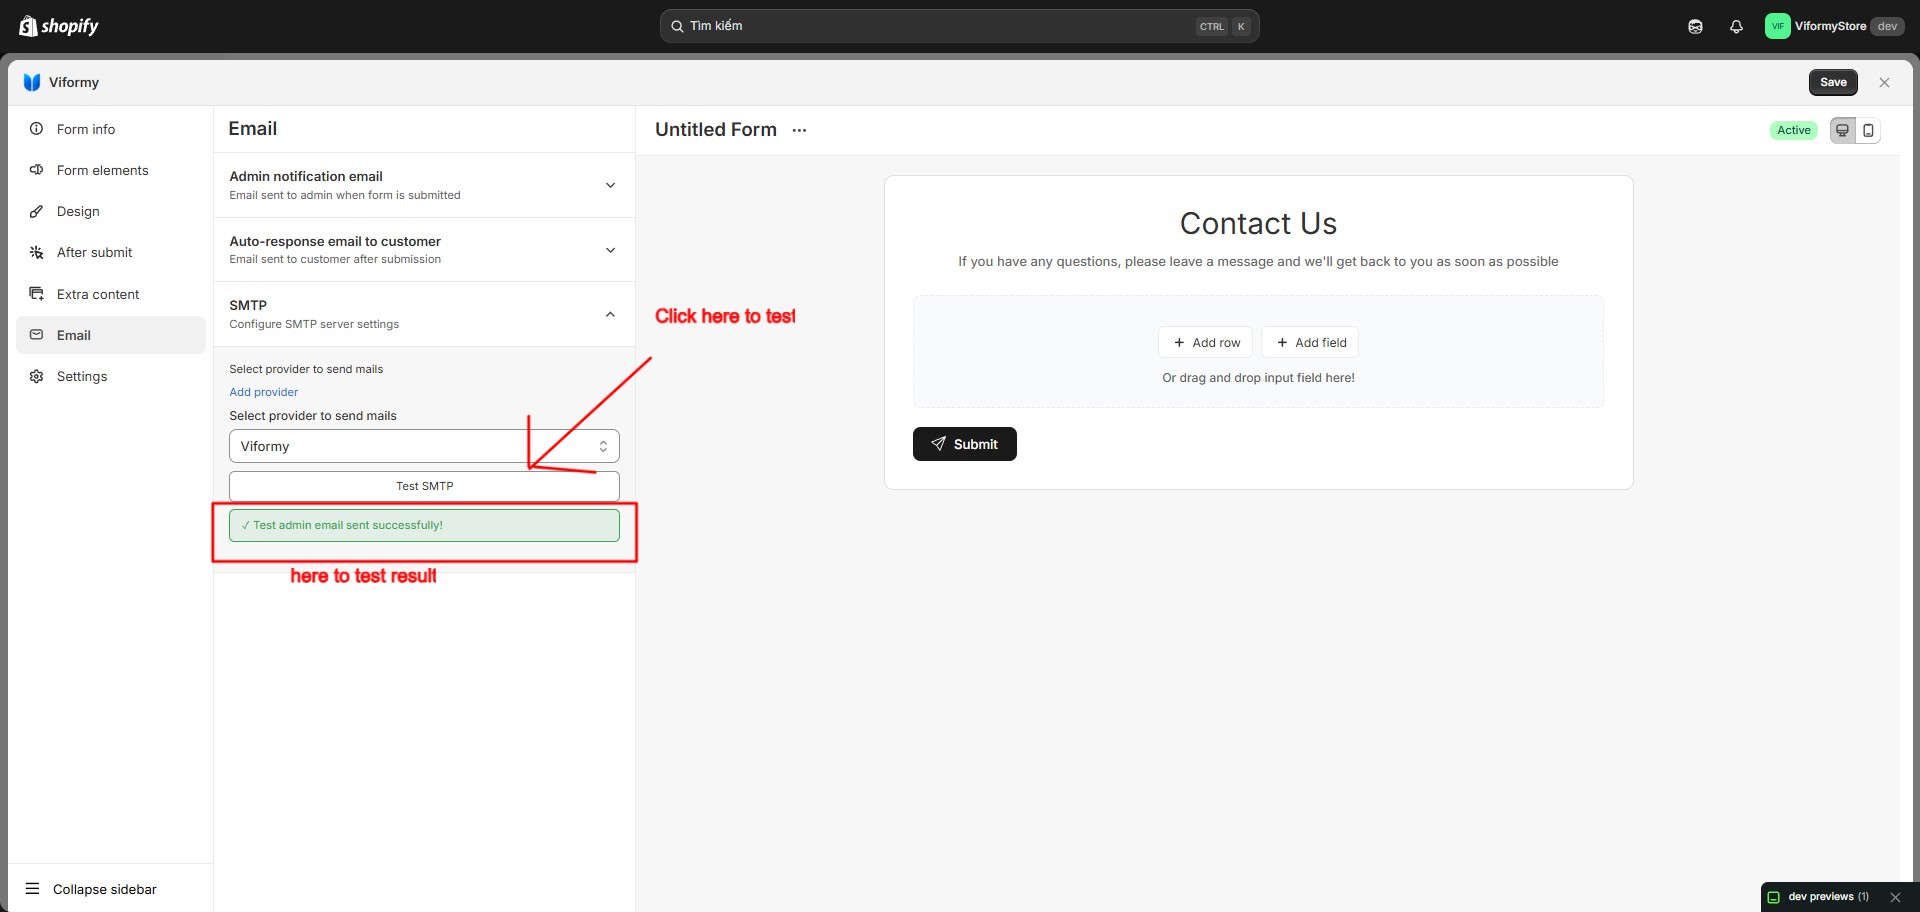
In the SMTP section of the Email panel, click Test SMTP.

When testing:

  • If Admin notification is enabled, Viformy sends a test admin email.
  • If Auto-response email to customer is enabled, Viformy sends a test customer email.
  • Subject and Email body variables are replaced with sample data.
  • The result is saved in Email Reports.

If neither Admin notification nor Auto-response is enabled, Viformy will ask you to enable at least one email option before testing.

admin email image 5

Manage Providers in Settings #

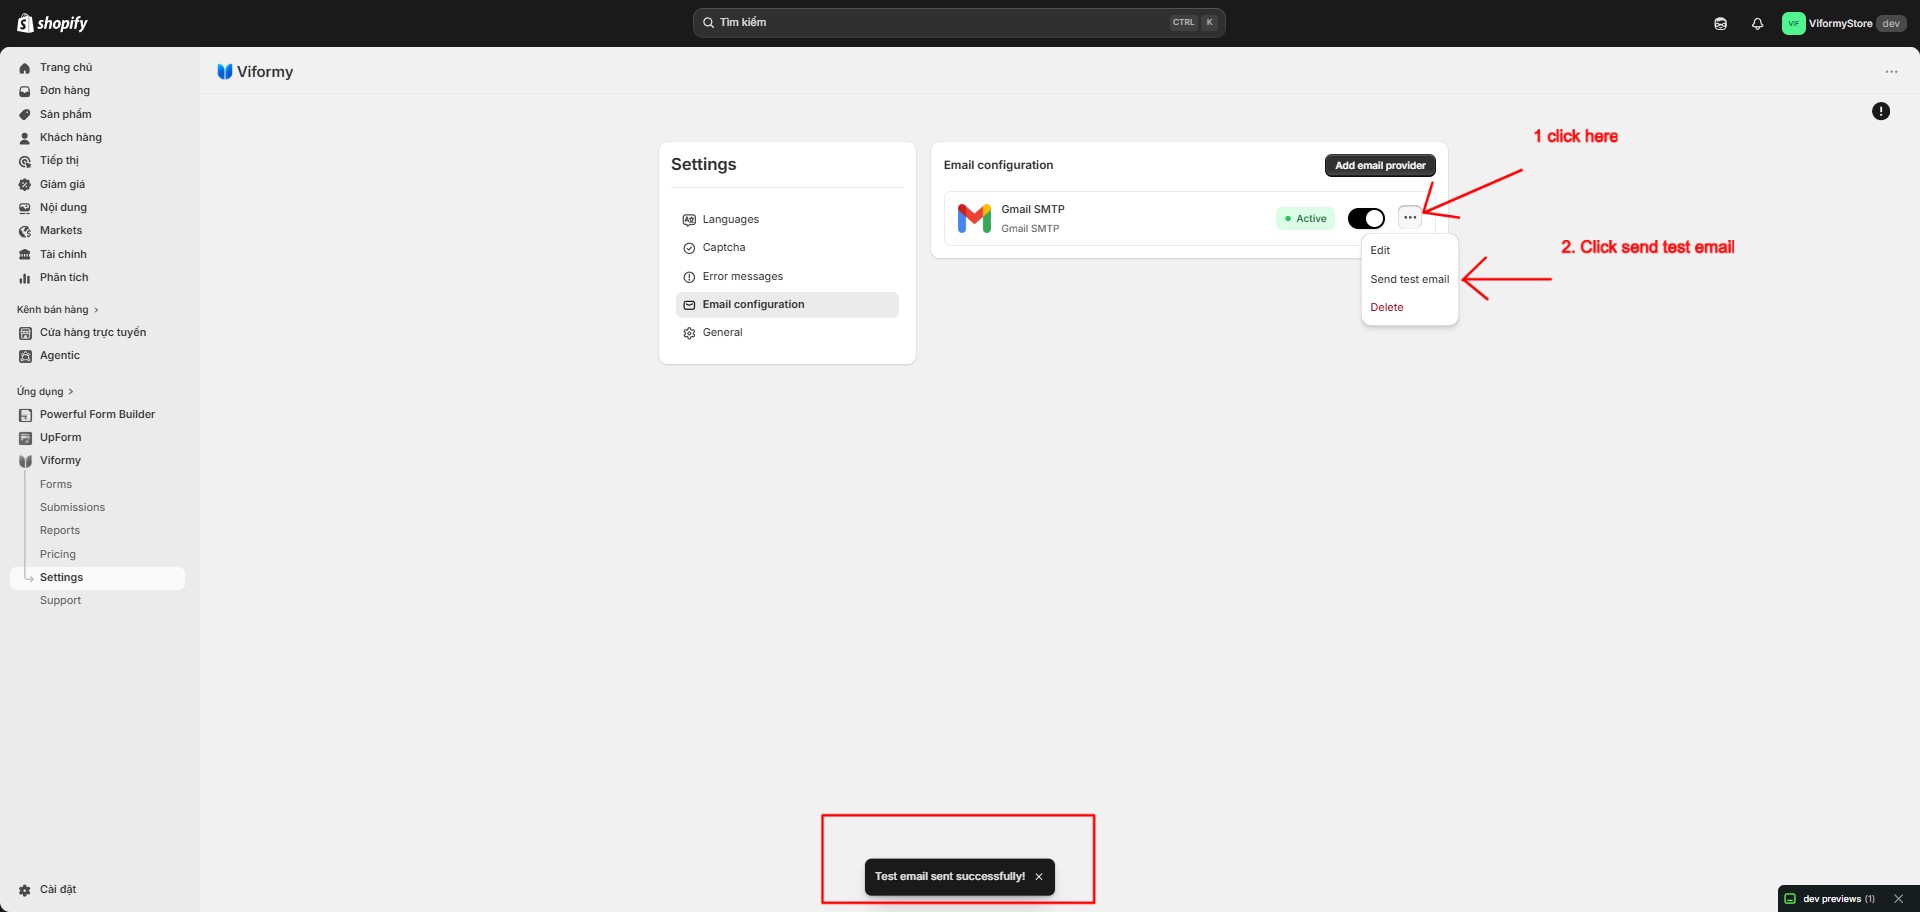
In Settings > Email configuration, you can manage all email providers.

  • Add a new provider
  • Edit an existing provider
  • Send a test email
  • Enable or disable Active status
  • Delete a provider

Provider status may show as Active, Failed, or Inactive. We recommend selecting only Active providers for your forms.

Common SMTP Errors #

1. Recipient email is required

This happens when the test email does not have a recipient. Check the To field in Admin notification or Customer auto-response. If you use {{shop_email}}, make sure your store has an email in Shopify Admin > Settings > Store details.

2. Gmail email and app password are required

This means the Gmail address or App Password is missing. Enter the correct Gmail address, create an App Password from your Google Account, and do not use your normal Gmail login password.

3. Sender email is not verified

This is common with SendGrid or Amazon SES. Verify the sender email or domain in your provider account. For SendGrid, verify Sender Identity. For AWS SES, verify the email or domain in Verified identities.

4. AWS SES Sandbox Error

This happens when AWS SES is still in sandbox mode. Verify both sender and recipient emails for testing, or request production access to send emails to real customers.

5. Unsupported SMTP provider for sending

This means the selected provider is not supported by the sending system. Viformy currently supports Gmail SMTP, Brevo, Mailjet, Twilio SendGrid, and Amazon.

Quick Setup Example #

If you want a quick and simple setup, you can start with Gmail SMTP:

  • Provider: Gmail SMTP
  • Gmail email: yourstore@gmail.com
  • App password: Gmail App Password
  • Encryption: TLS
  • Title: Store Gmail SMTP
  • Active: On

For stores with higher email volume, consider using Brevo, SendGrid, Amazon SES, or Mailjet.

Updated on May 27, 2026

What are your Feelings

  • Happy
  • Normal
  • Sad

Share This Article :

  • Facebook
  • X
  • LinkedIn
  • Pinterest
Customer email notificationMail API setup
ON THIS PAGE
  • How to Configure SMTP Setup in Viformy
  • Step 1: Open SMTP Setup
  • Step 2: Select an Email Provider
  • Step 3: Add a New Email Provider
  • Gmail SMTP Configuration
  • Brevo Configuration
  • Mailjet Configuration
  • Twilio SendGrid Configuration
  • Amazon SES Configuration
  • Step 4: Save the Provider
  • Step 5: Select the Provider for a Form
  • Step 6: Test SMTP in the Form
  • Manage Providers in Settings
  • Common SMTP Errors
  • Quick Setup Example

The most powerful and flexible form building solution for Shopify merchants.

Product

  • Features
  • Integrations
  • Pricing

Support

  • Documentation
  • Help Center
  • API Reference

Legal

  • Privacy Policy
  • Terms of Service