logo website
  • Home
  • Features
  • Templates
  • Pricing
  • Docs
  • Install App
Menu
  • Home
  • Features
  • Templates
  • Pricing
  • Docs
  • Install App

Getting Started

1
  • Introduction

Quick Start

1
  • Create a new form

Display & Placement

5
  • Theme integration
  • Get embed form ID of a form
  • Display a form on Shopify front store
  • Display a form on a specific page
  • Add a form with app block

App Integration

2
  • Google reCAPTCHA Integration
  • hCaptcha integration

Mail Notification

4
  • Admin email notification
  • Customer email notification
  • SMTP Setup
  • Mail API setup

Data, Insights & Management

5
  • Check submissions data
  • View Insight of the Form
  • Export submissions data
  • Export and import forms
  • Disable saving submission data for forms
View Categories

Customer email notification

5 min read

How to Configure Customer Email Notification in Viformy #

Customer Email Notification is an automatic confirmation email sent to customers after they submit a form. It is commonly used to send a thank-you message, confirm that the submission was received, or provide next steps to the customer.

Before You Start #

Before configuring customer email notification, make sure the following requirements are met:

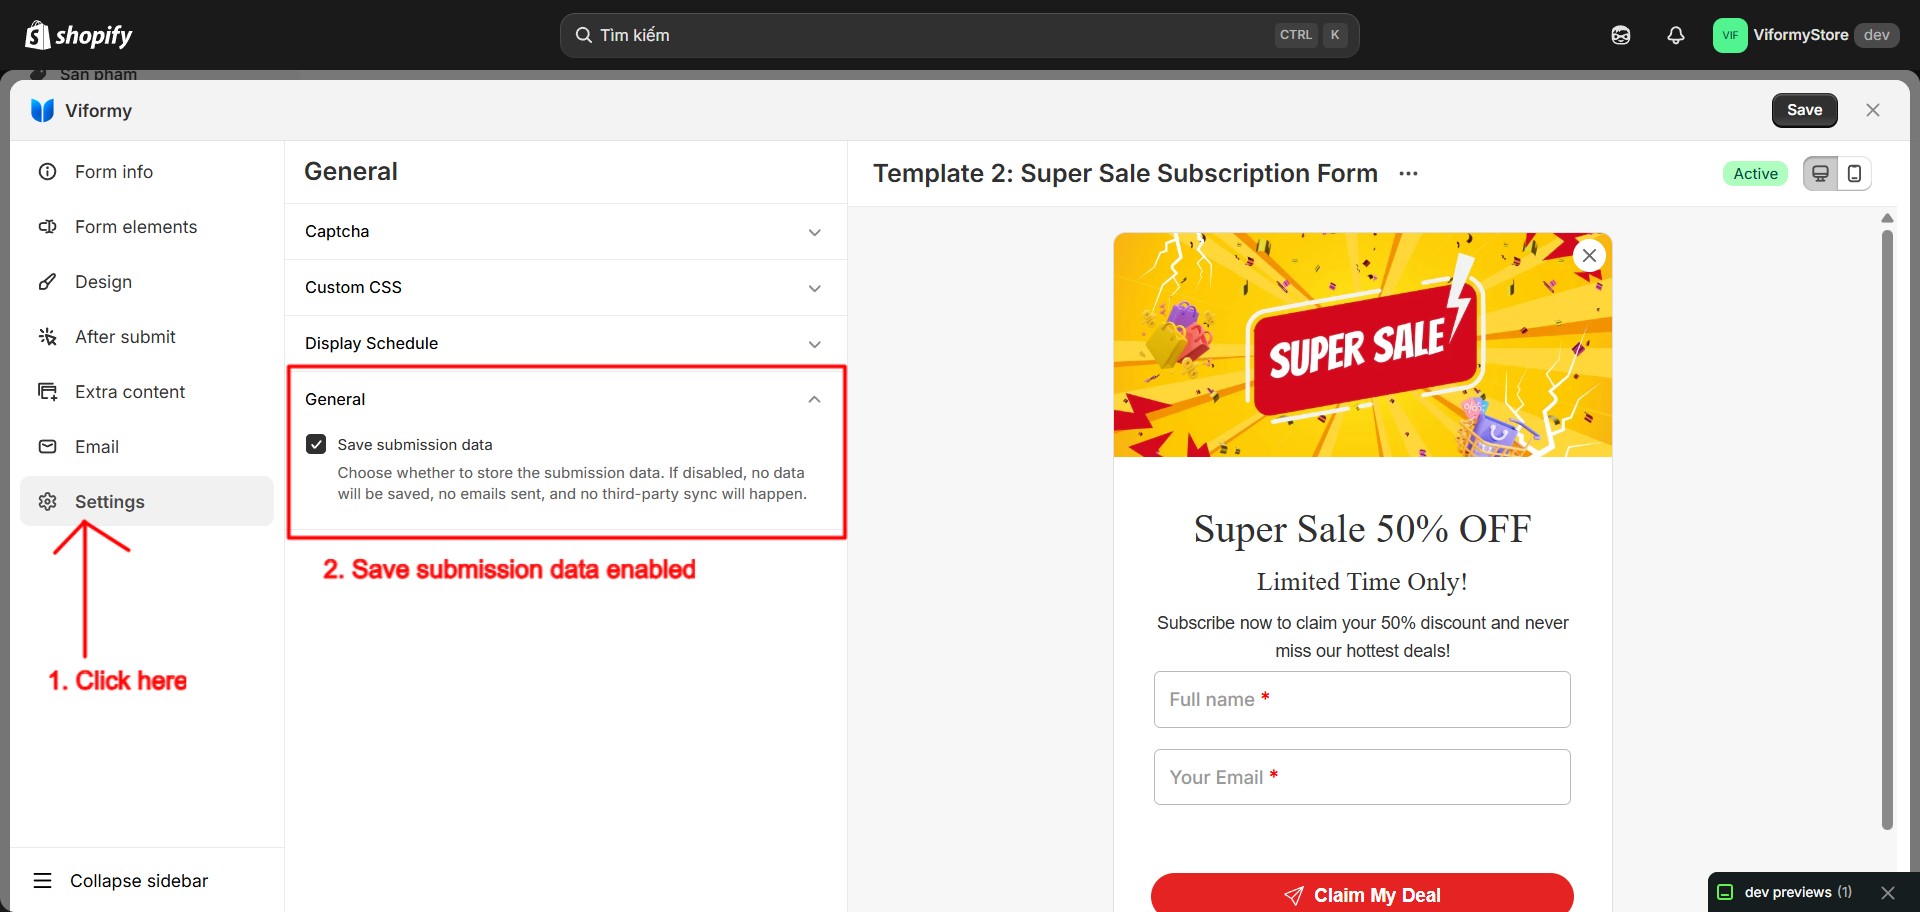
  • Save submission data is enabled: Open the form Settings tab and make sure Save submission data is turned on. If this option is disabled, Viformy will not save submissions or send emails.
  • The form has an Email field: Customers must enter a valid email address so Viformy knows where to send the auto-response email.
  • The Email field is marked as Primary email: This helps the system identify the main customer email for auto-response and contact-related processing.
  • An email provider is available: You can use the default Viformy provider or configure your own SMTP provider in the SMTP section.
cunstomer email 1

Step 1: Add an Email Field to the Form #
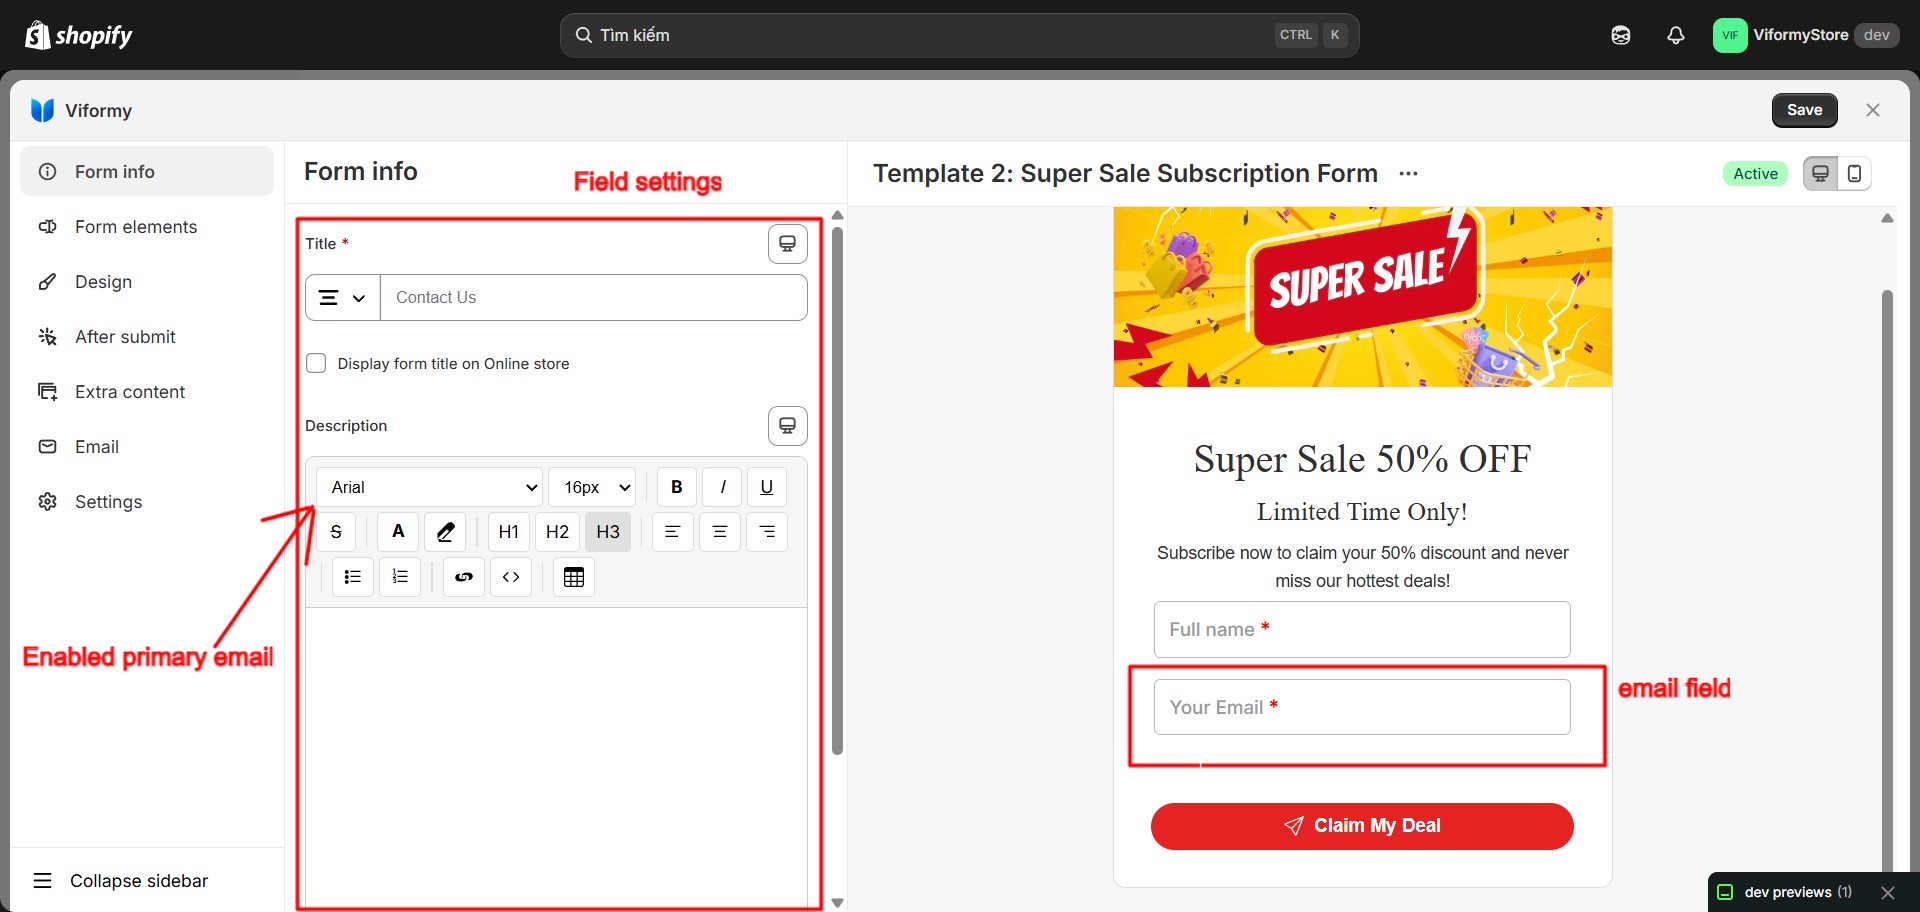
Open your form in Form Builder, go to the Form elements tab, and add an Email field to the form.

Click the Email field to open its settings, then enable Primary email if this is the main email address customers will use.

Recommendation: Use only one primary Email field so the system can correctly identify the customer email address.

cunstomer email 2

Step 2: Open Customer Email Notification #

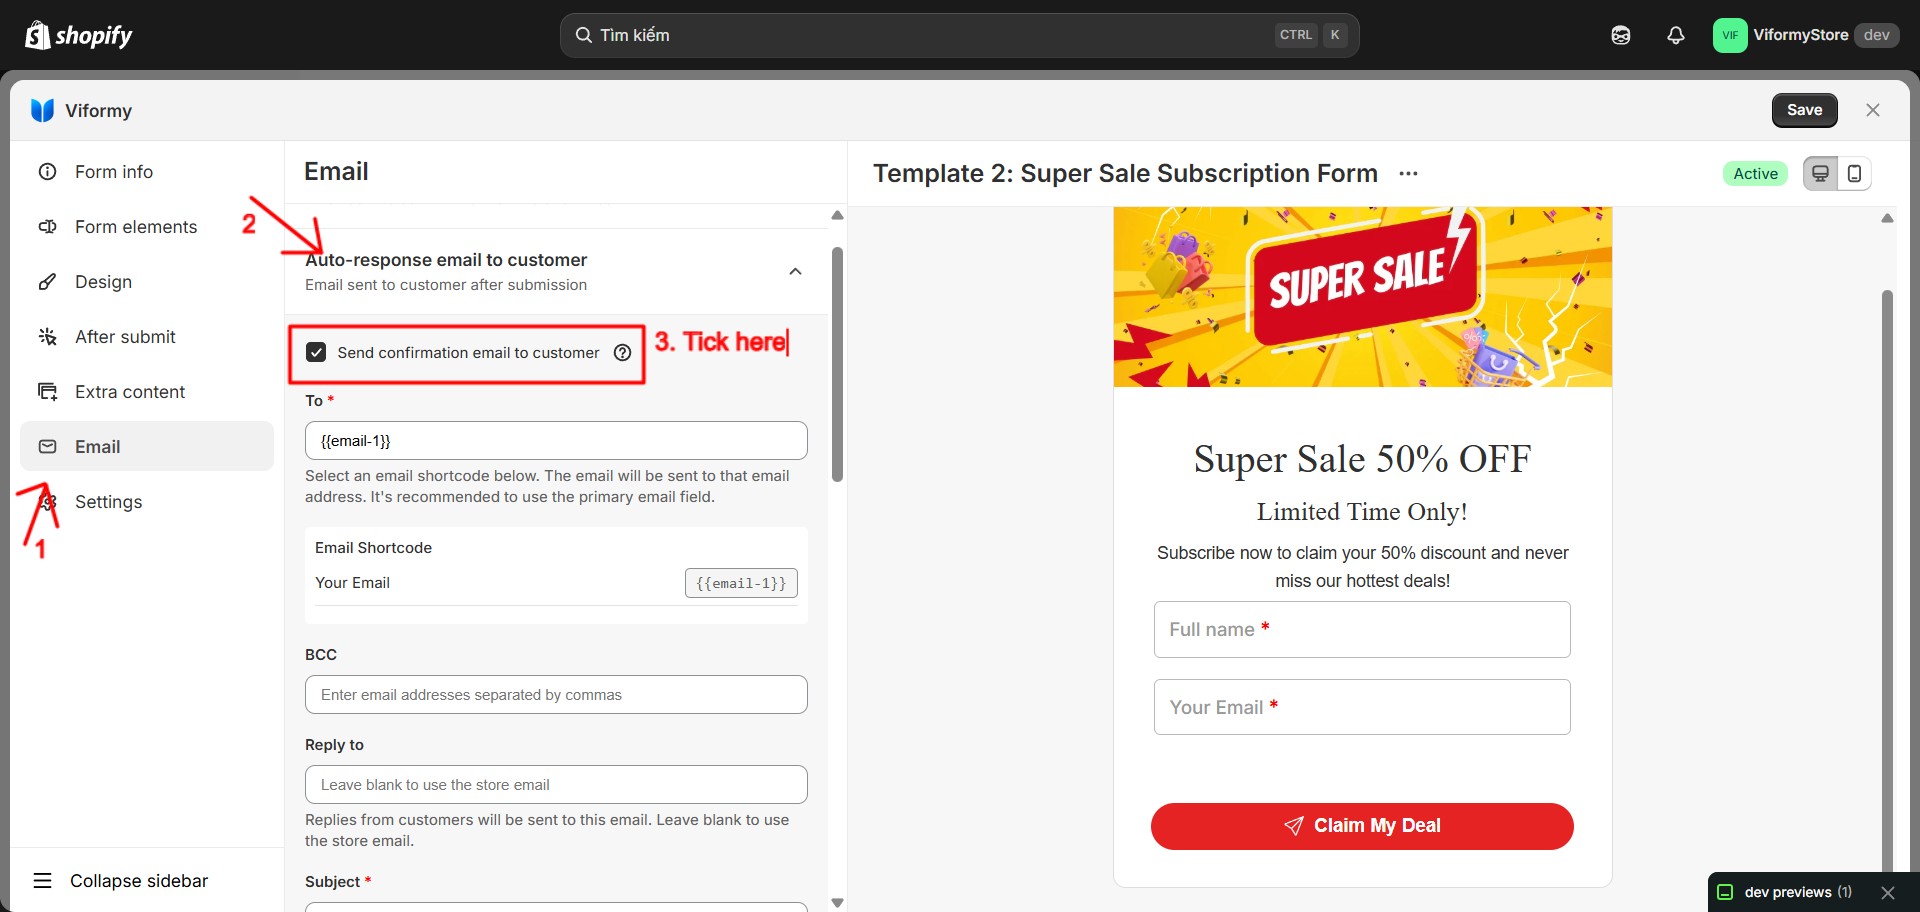
In the left sidebar of the Form Builder, select the Email tab. Then open Auto-response email to customer.

Enable Send confirmation email to customer. Once enabled, Viformy will send a confirmation email to the customer after they submit the form.

The following fields are required when customer notification is enabled:

  • To
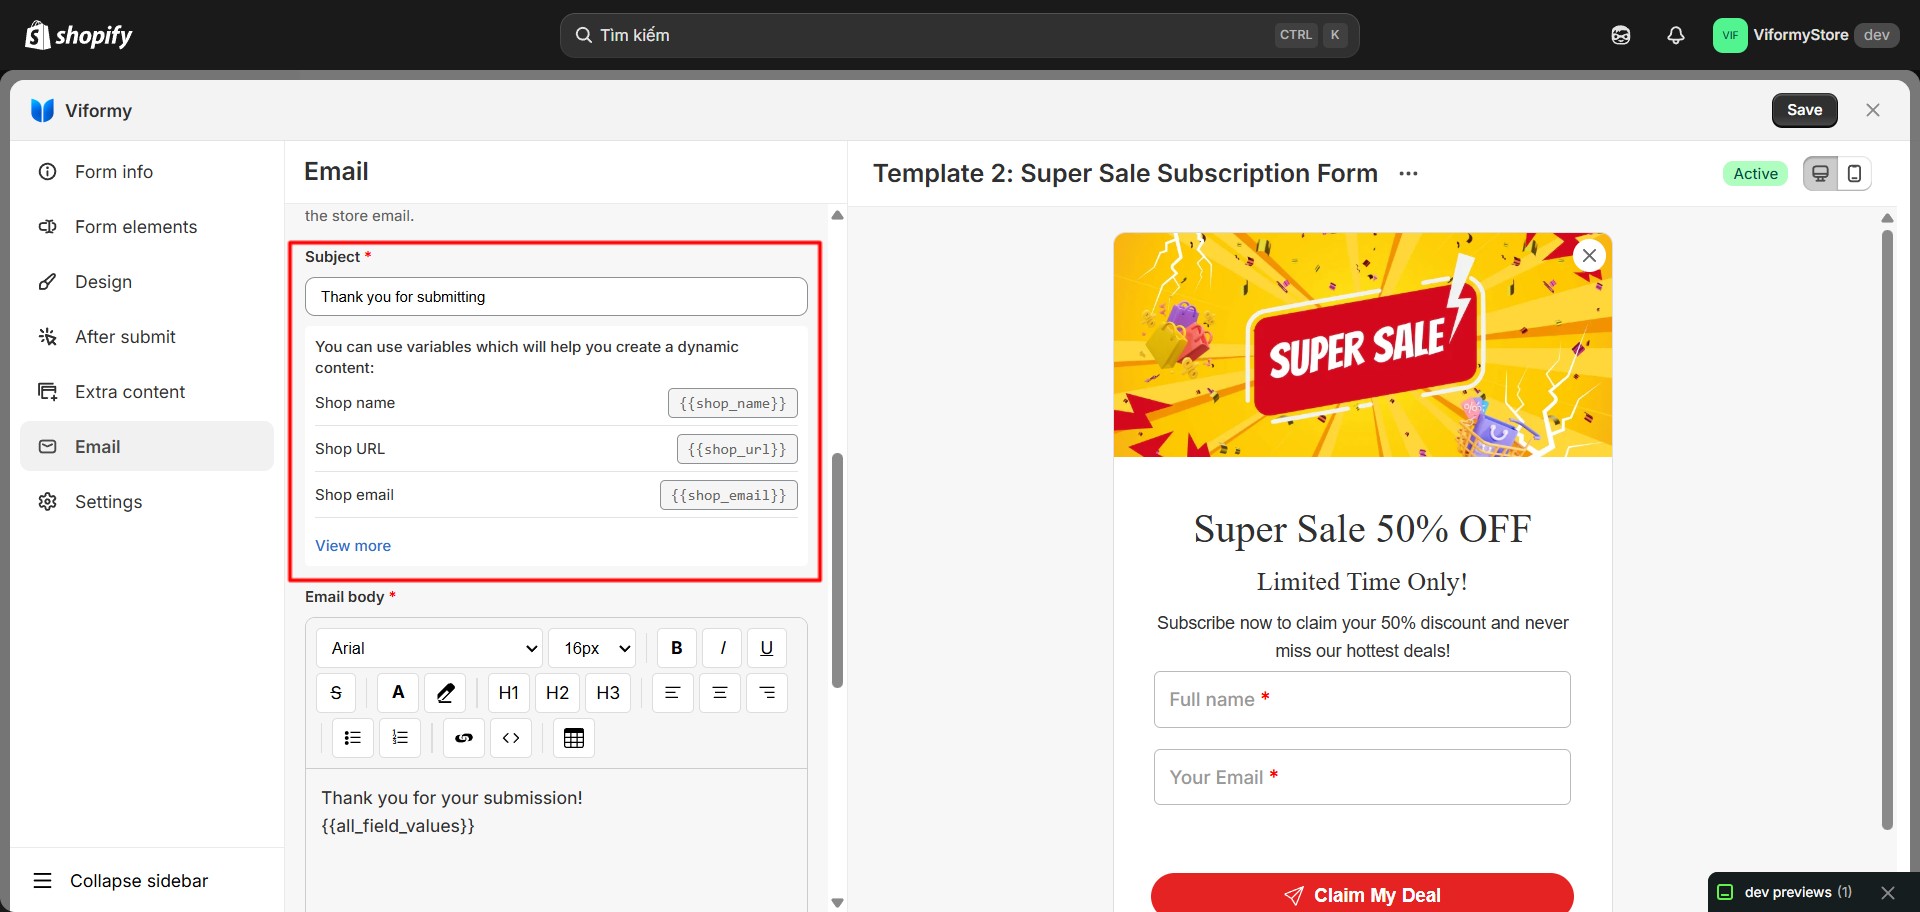
  • Subject
  • Email body

cunstomer email 3

Step 3: Configure the To Field #

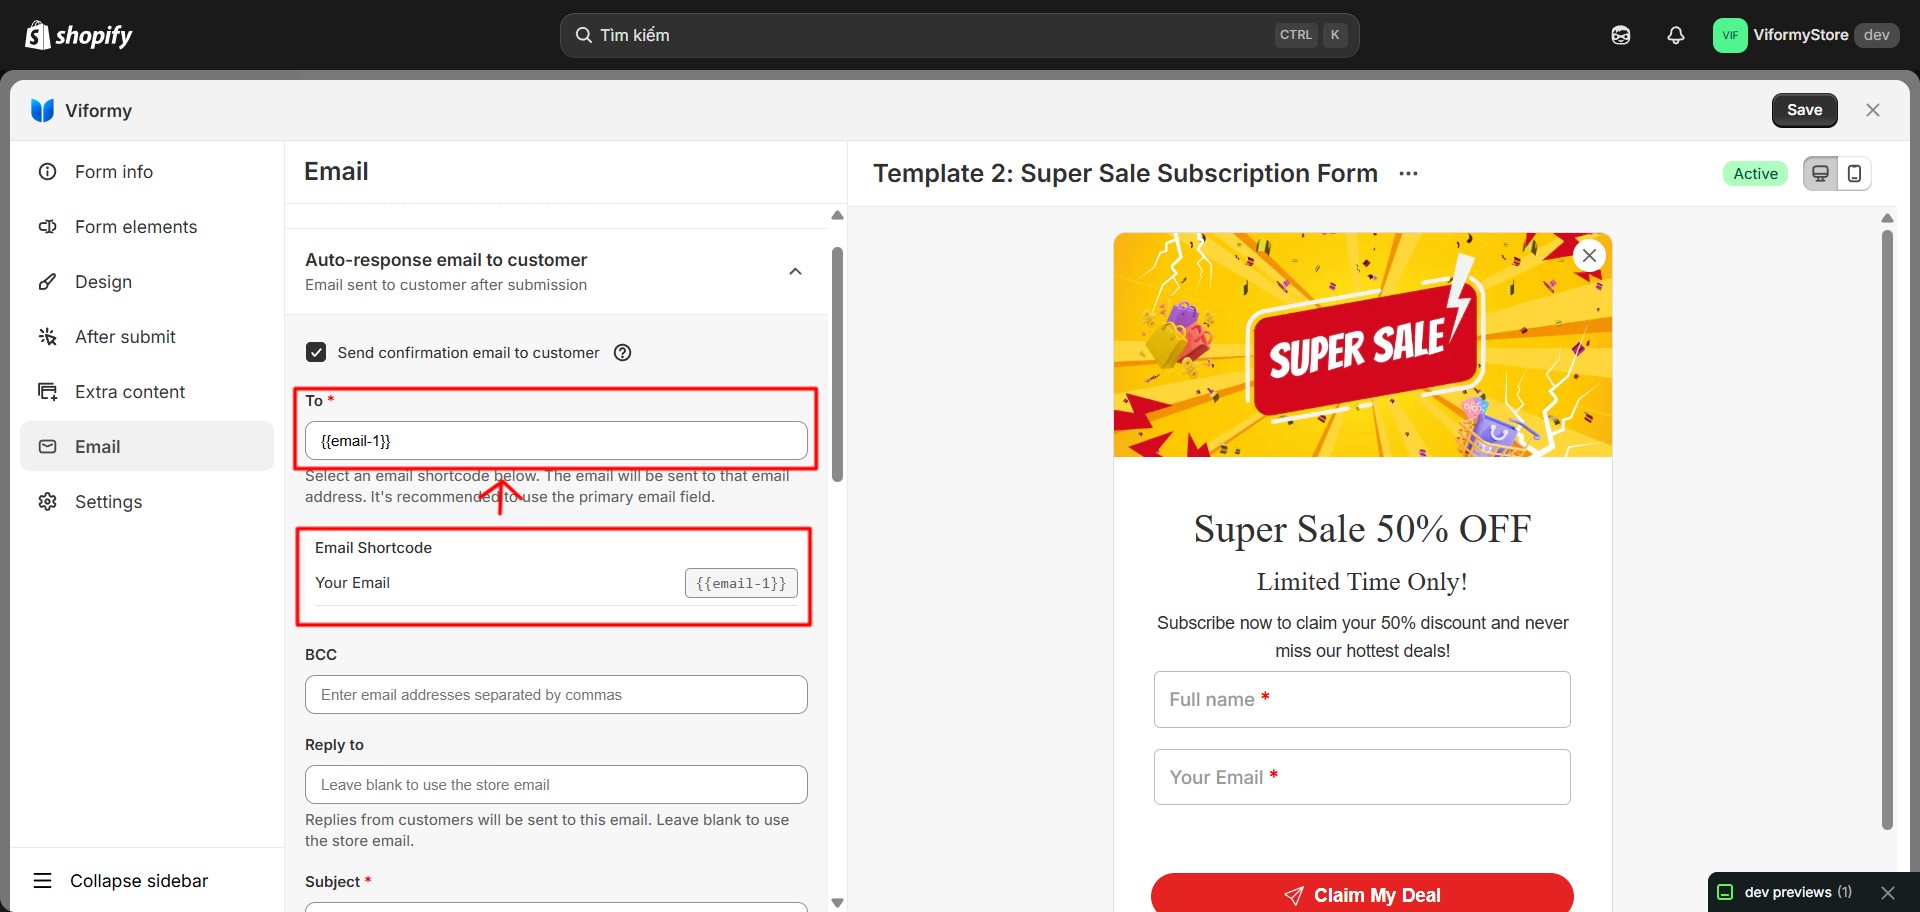
The To field is the customer email address that will receive the confirmation email.

You should use the shortcode of the Email field in your form. For example:

{{email-1}}

In the Email panel, find the Email Shortcode area. Click the shortcode to copy it, then paste it into the To field.

Note: If the customer does not enter a valid email address, Viformy will skip the auto-response email because no customer email can be found.

cunstomer email 4

Step 4: Configure BCC #

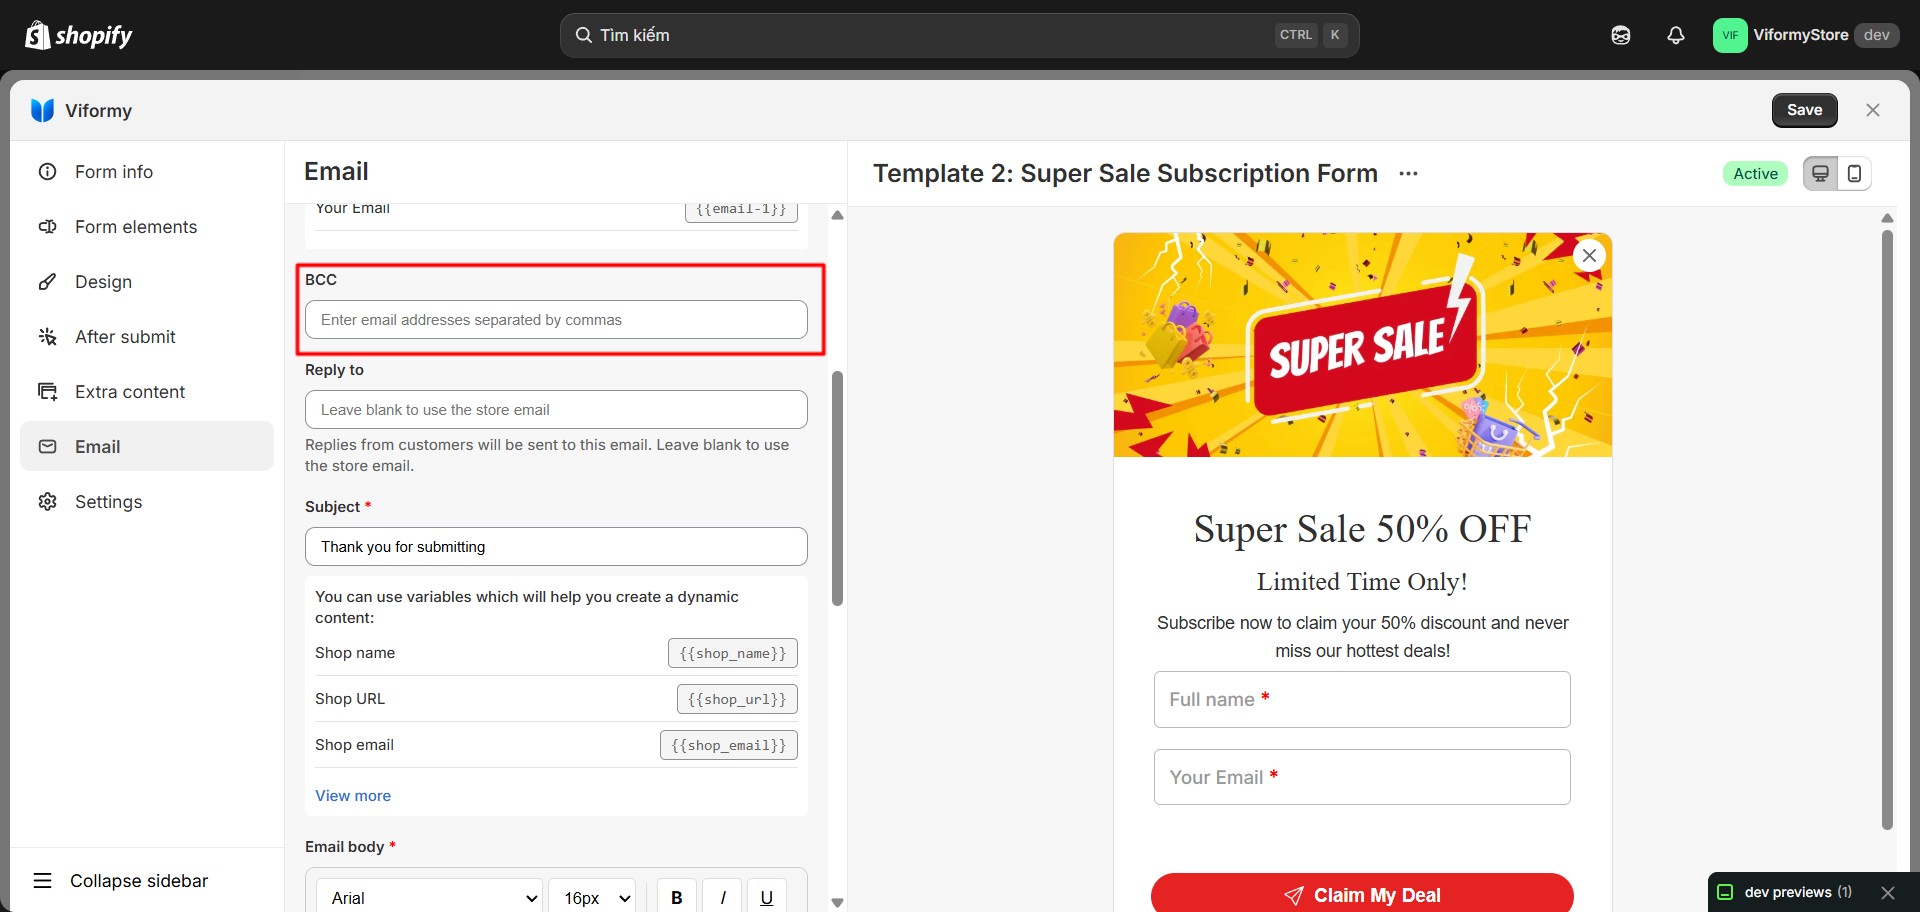
The BCC field allows you to send a hidden copy of the confirmation email to your internal team.

support@example.com, sales@example.com

This field is optional. BCC is useful when your shop wants to keep a copy of the confirmation email or let the support team receive the same content.

cunstomer email 5

Step 5: Configure Reply-To #

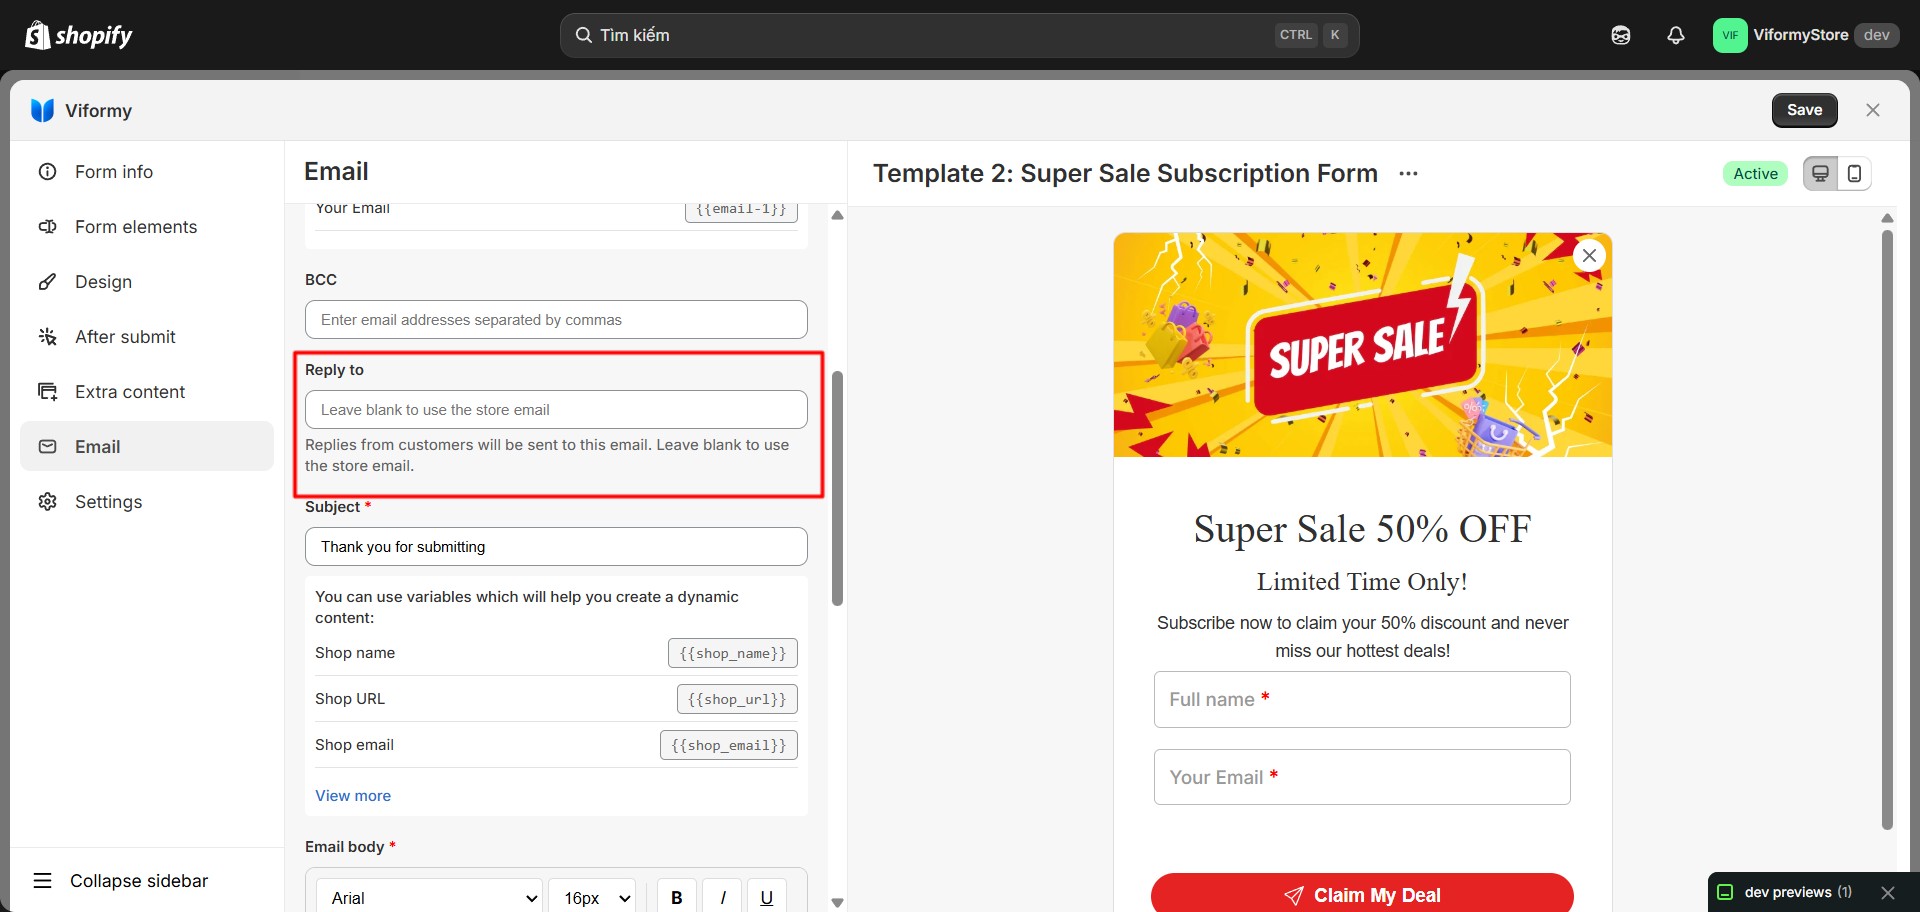
Reply-To is the email address that receives replies when a customer clicks Reply in the confirmation email.

support@example.com

If you want customers to reply to your support team, use an address such as:

support@yourstore.com cunstomer email 5.1

Step 6: Configure the Subject #

The Subject field is the title of the email customers receive.

Thank you for contacting {{shop_name}}

You can also use:

We received your submission for {{form_title}}

The subject supports dynamic variables such as:

  • {{shop_name}}
  • {{shop_url}}
  • {{shop_email}}
  • {{form_title}}
  • {{email-1}}
  • {{name-1}}

cunstomer email 6

Step 7: Configure the Email Body #

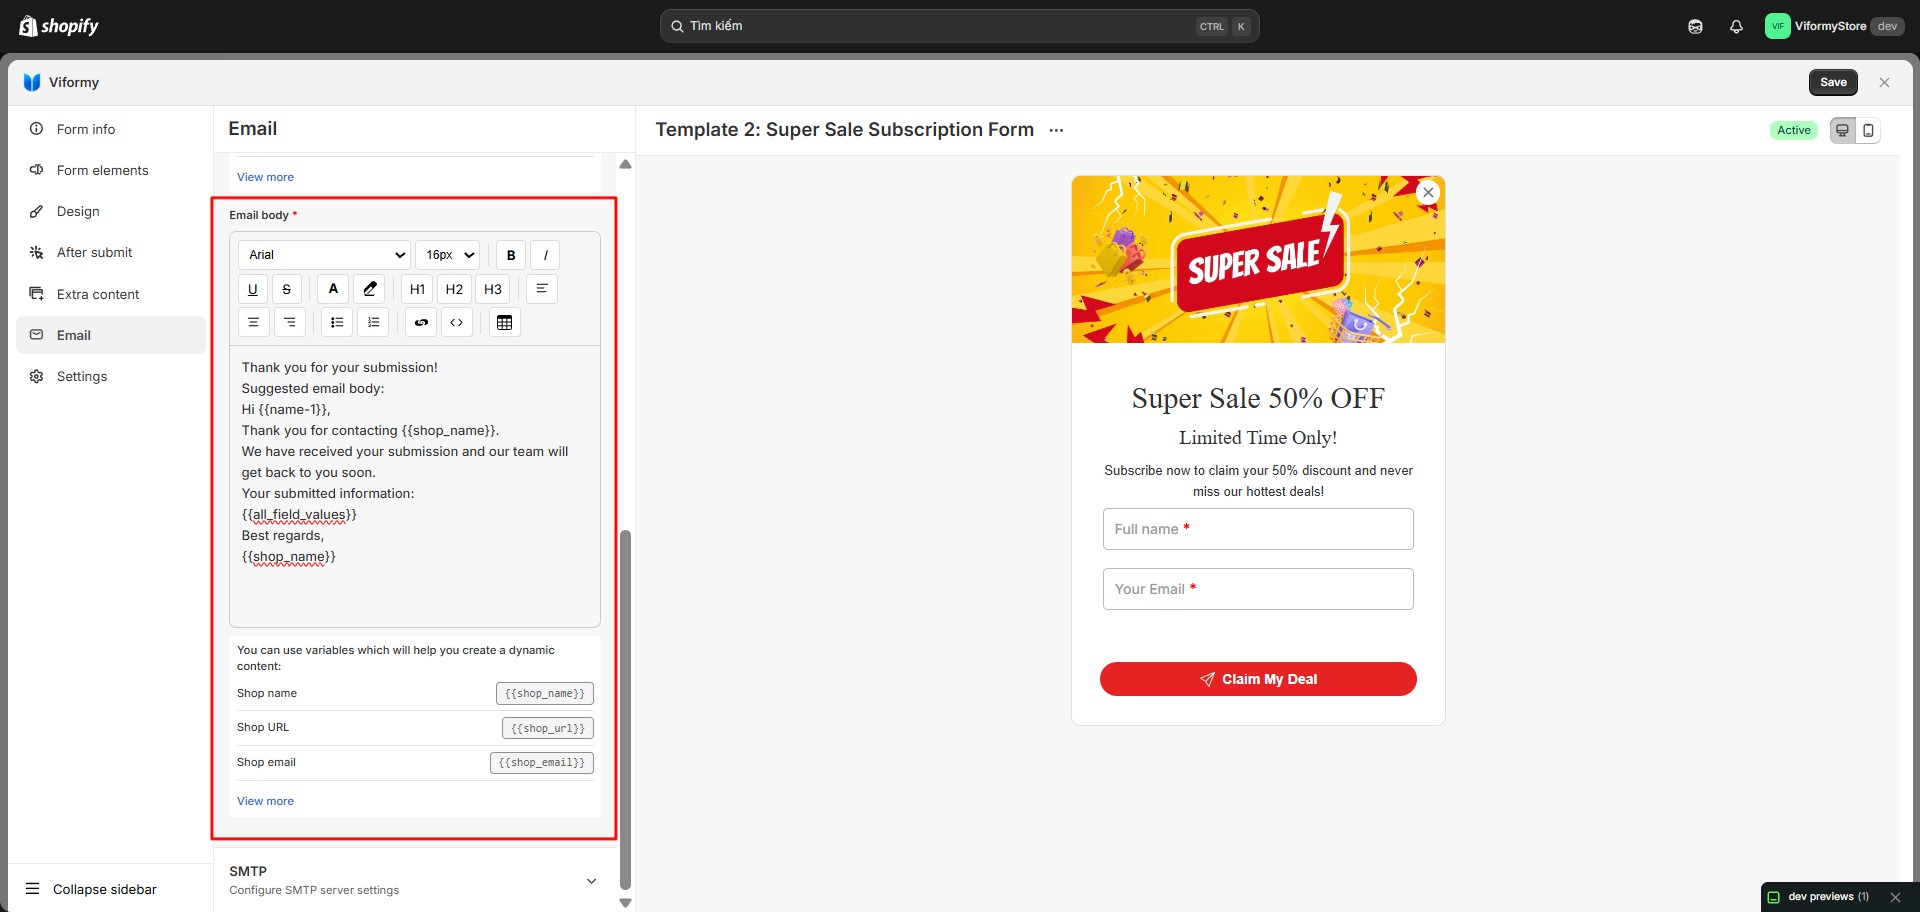
The Email body field is the content of the confirmation email. It uses a rich text editor, so you can add text, formatting, line breaks, and dynamic variables.

Default content:

Thank you for your submission!

Suggested email body:

Hi {{name-1}},

Thank you for contacting {{shop_name}}.

We have received your submission and our team will get back to you soon.

Your submitted information:
{{all_field_values}}

Best regards,
{{shop_name}}

Common variables for the email body:

  • {{shop_name}}: Store name
  • {{shop_url}}: Store URL
  • {{shop_email}}: Store email
  • {{form_title}}: Form title
  • {{all_field_values}}: All submitted field values
  • {{go_to_website_label="Go to website"}}: Creates a link to the store website
  • {{email-1}}, {{name-1}}, {{phone-1}}, {{textarea-1}}: Values from individual form fields
cunstomer email 7

Step 8: Select an SMTP Provider #

In the Email panel, open the SMTP section. You can use:

  • Viformy: Default provider
  • A custom provider such as Gmail SMTP, Brevo, Mailjet, Twilio SendGrid, Amazon SES, Yahoo SMTP, or Custom SMTP
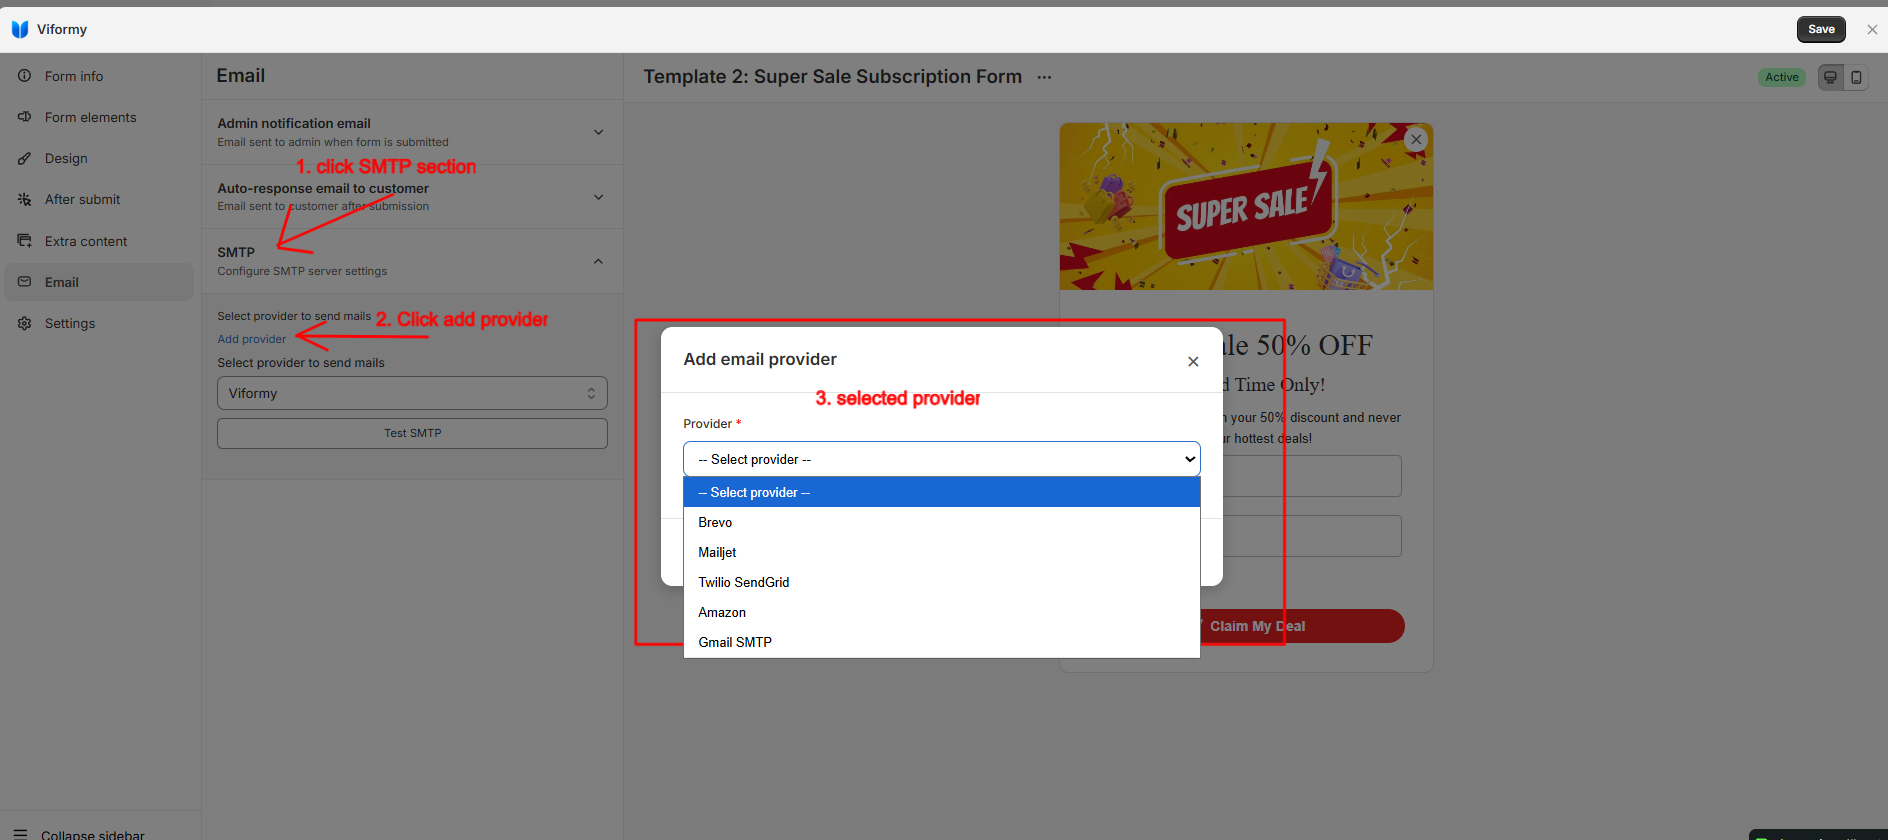
If you use a third-party provider, make sure the sender email has been verified by that provider.

cunstomer email 8

To configure SMTP, you can view the setup guide here:

SMTP Setup Guide

Step 9: Test the Email #

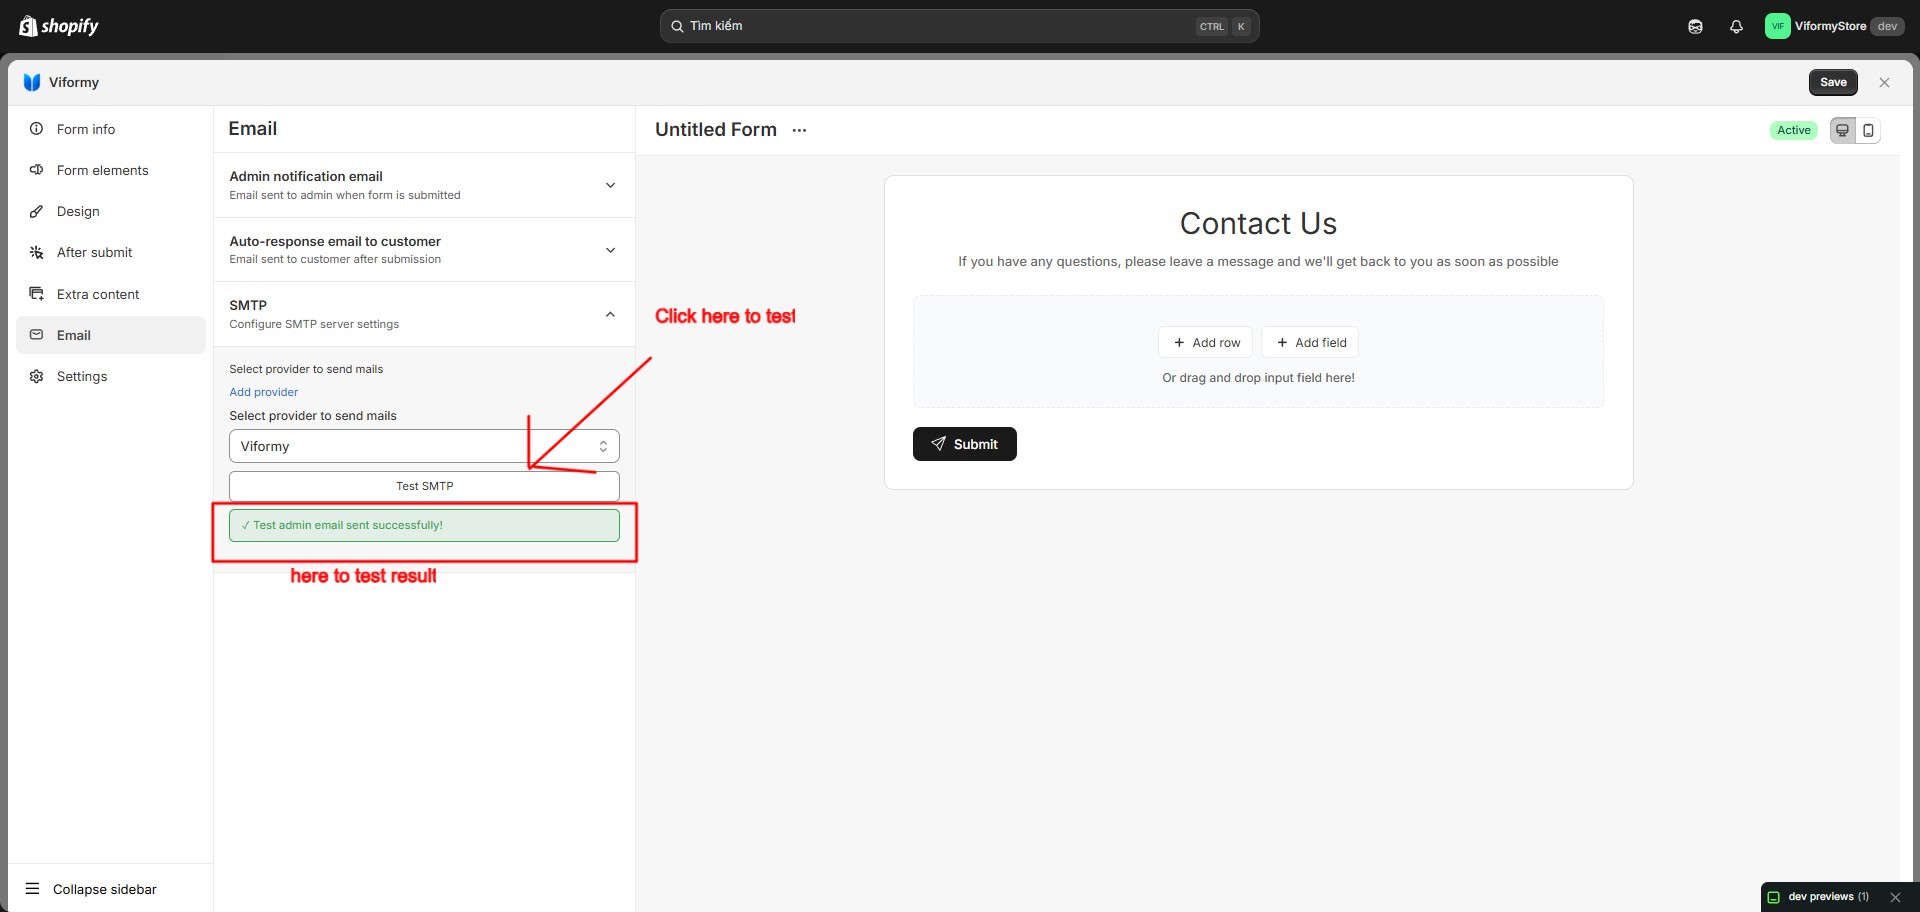
After configuring the email, use the test email function in the Email panel.

When testing, Viformy checks the selected provider, sends a test email to the shortcode or email in the To field, replaces variables with sample form data, and records the result in Email Reports.

If the test fails, check the following:

  • The To field contains a valid shortcode or email address.
  • The form has an Email field.
  • The Subject field is not empty.
  • The Email body field is not empty.
  • The SMTP provider is configured correctly.
  • The sender email has been verified.

admin email image 5

Step 10: Save the Form #

Email settings are saved automatically after you stop editing for about 1.5 seconds.

When saving the form, if Auto-response email to customer is enabled and required fields are missing, Viformy will show a warning. Make sure these fields are completed:

  • To
  • Subject
  • Email body

What Happens After Configuration #

  • The submission is saved.
  • Viformy finds the customer email from the submitted data.
  • Variables in the Subject and Email body are replaced with real values.
  • The confirmation email is sent to the customer.
  • The sending result is saved in Email Reports.

If Viformy cannot find a valid customer email address, the auto-response email will be skipped.

Quick Setup Example #

To:

{{email-1}}

BCC:

support@example.com

Reply-To:

support@example.com

Subject:

Thank you for contacting {{shop_name}}

Email body:

Hi {{name-1}},

Thank you for your submission.

We have received your information and will contact you soon.

Your submitted information:
{{all_field_values}}

Best regards,
{{shop_name}}
Updated on May 27, 2026

What are your Feelings

  • Happy
  • Normal
  • Sad

Share This Article :

  • Facebook
  • X
  • LinkedIn
  • Pinterest
Admin email notificationSMTP Setup
ON THIS PAGE
  • How to Configure Customer Email Notification in Viformy
  • Before You Start
  • Step 1: Add an Email Field to the Form
  • Step 2: Open Customer Email Notification
  • Step 3: Configure the To Field
  • Step 4: Configure BCC
  • Step 5: Configure Reply-To
  • Step 6: Configure the Subject
  • Step 7: Configure the Email Body
  • Step 8: Select an SMTP Provider
  • Step 9: Test the Email
  • Step 10: Save the Form
  • What Happens After Configuration
  • Quick Setup Example

The most powerful and flexible form building solution for Shopify merchants.

Product

  • Features
  • Integrations
  • Pricing

Support

  • Documentation
  • Help Center
  • API Reference

Legal

  • Privacy Policy
  • Terms of Service