logo website
  • Home
  • Features
  • Templates
  • Pricing
  • Docs
  • Install App
Menu
  • Home
  • Features
  • Templates
  • Pricing
  • Docs
  • Install App

Getting Started

1
  • Introduction

Quick Start

1
  • Create a new form

Display & Placement

5
  • Theme integration
  • Get embed form ID of a form
  • Display a form on Shopify front store
  • Display a form on a specific page
  • Add a form with app block

App Integration

2
  • Google reCAPTCHA Integration
  • hCaptcha integration

Mail Notification

4
  • Admin email notification
  • Customer email notification
  • SMTP Setup
  • Mail API setup

Data, Insights & Management

5
  • Check submissions data
  • View Insight of the Form
  • Export submissions data
  • Export and import forms
  • Disable saving submission data for forms
View Categories

Check submissions data

3 min read

How to Check Submission Data in Viformy #

Submission data is the information customers send through your forms. In Viformy, you can view, search, filter, organize, export, and manage submissions from the Submissions page.

Each submission can include customer field values, form name, sender, submitted time, PIN code, status, tags, notes, device information, page, language, country, IP address, user agent, and uploaded files if the form contains upload fields.

Before You Start #

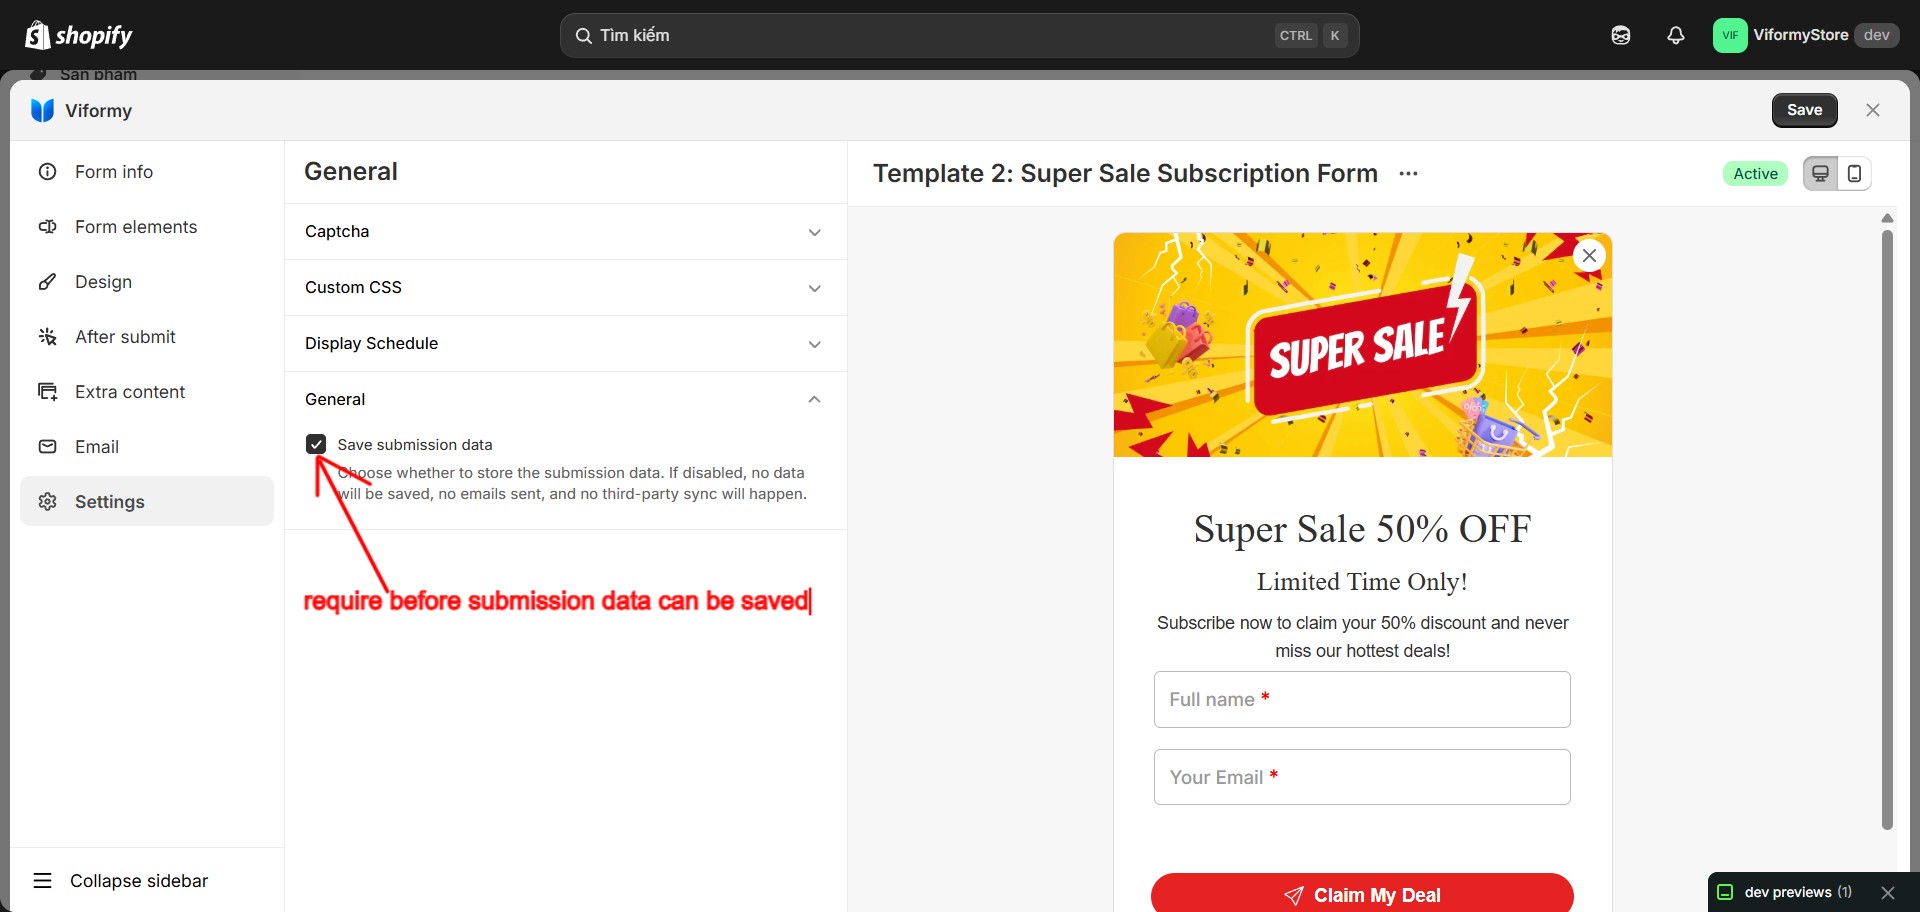
Before checking submission data, make sure Save submission data is enabled for the form.

  • Open the form in Form Builder.
  • Go to the Settings tab.
  • Turn on Save submission data.

Important: If Save submission data is disabled, Viformy will not save submissions, send emails, or sync data to third-party integrations.

check sum 1

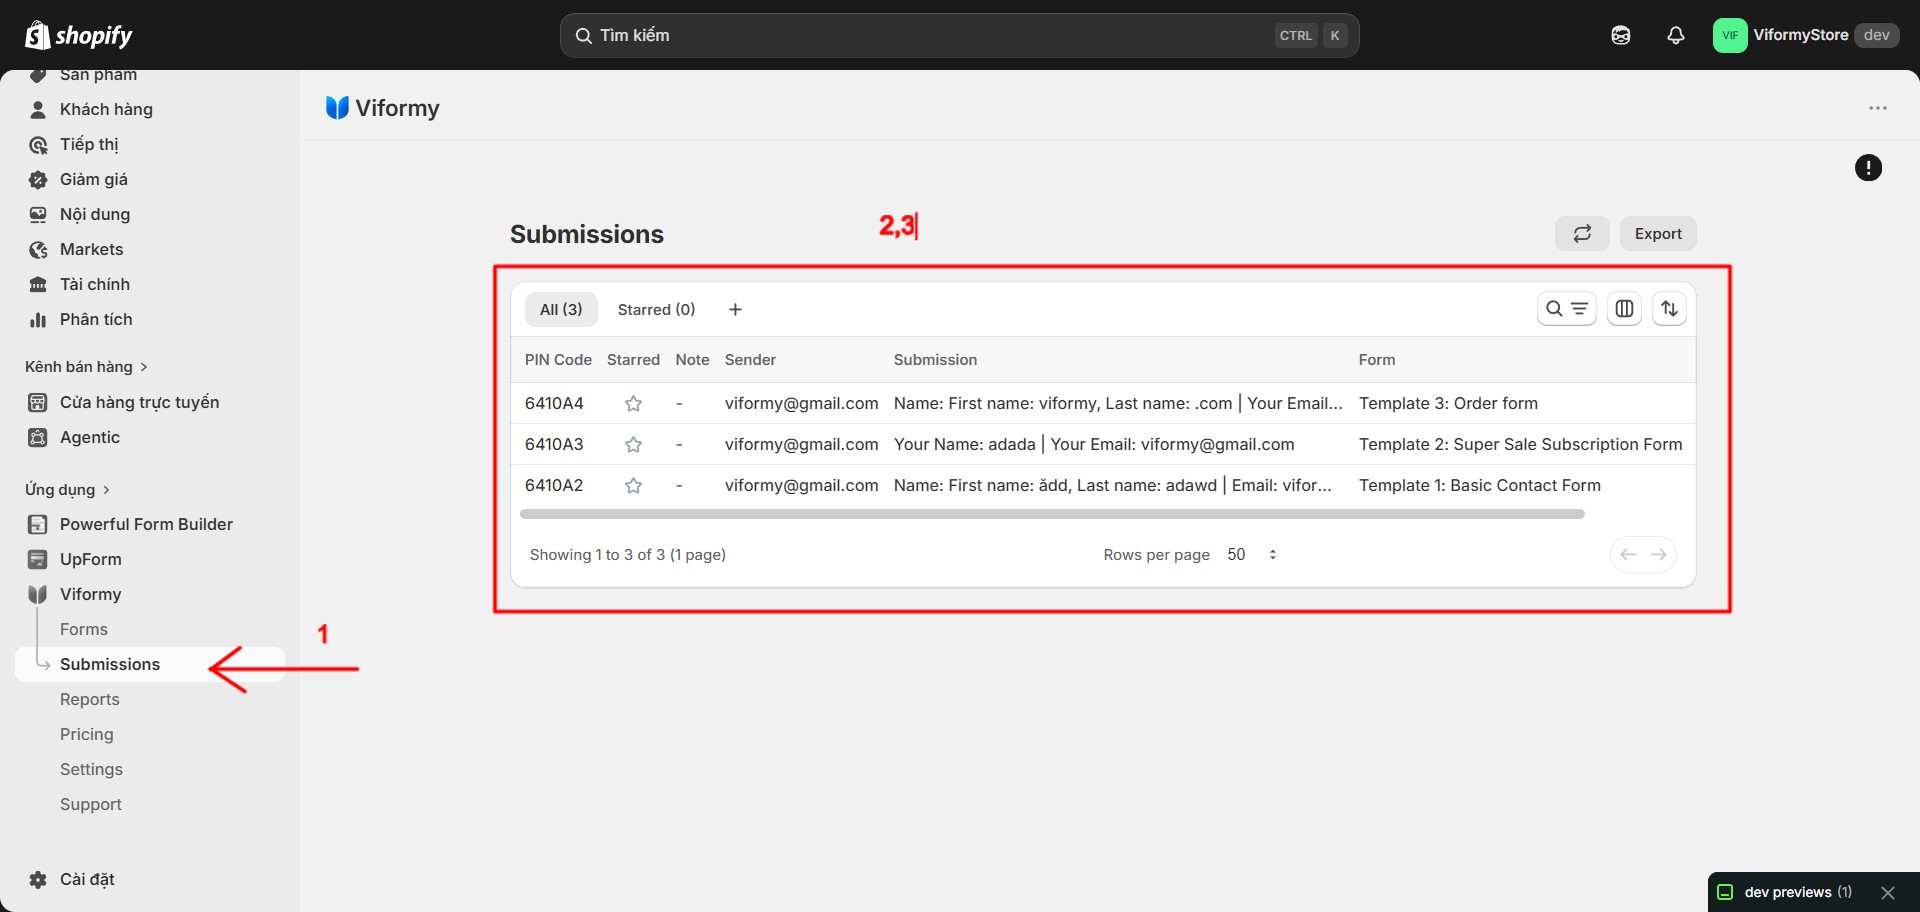
Step 1: Open the Submissions Page #

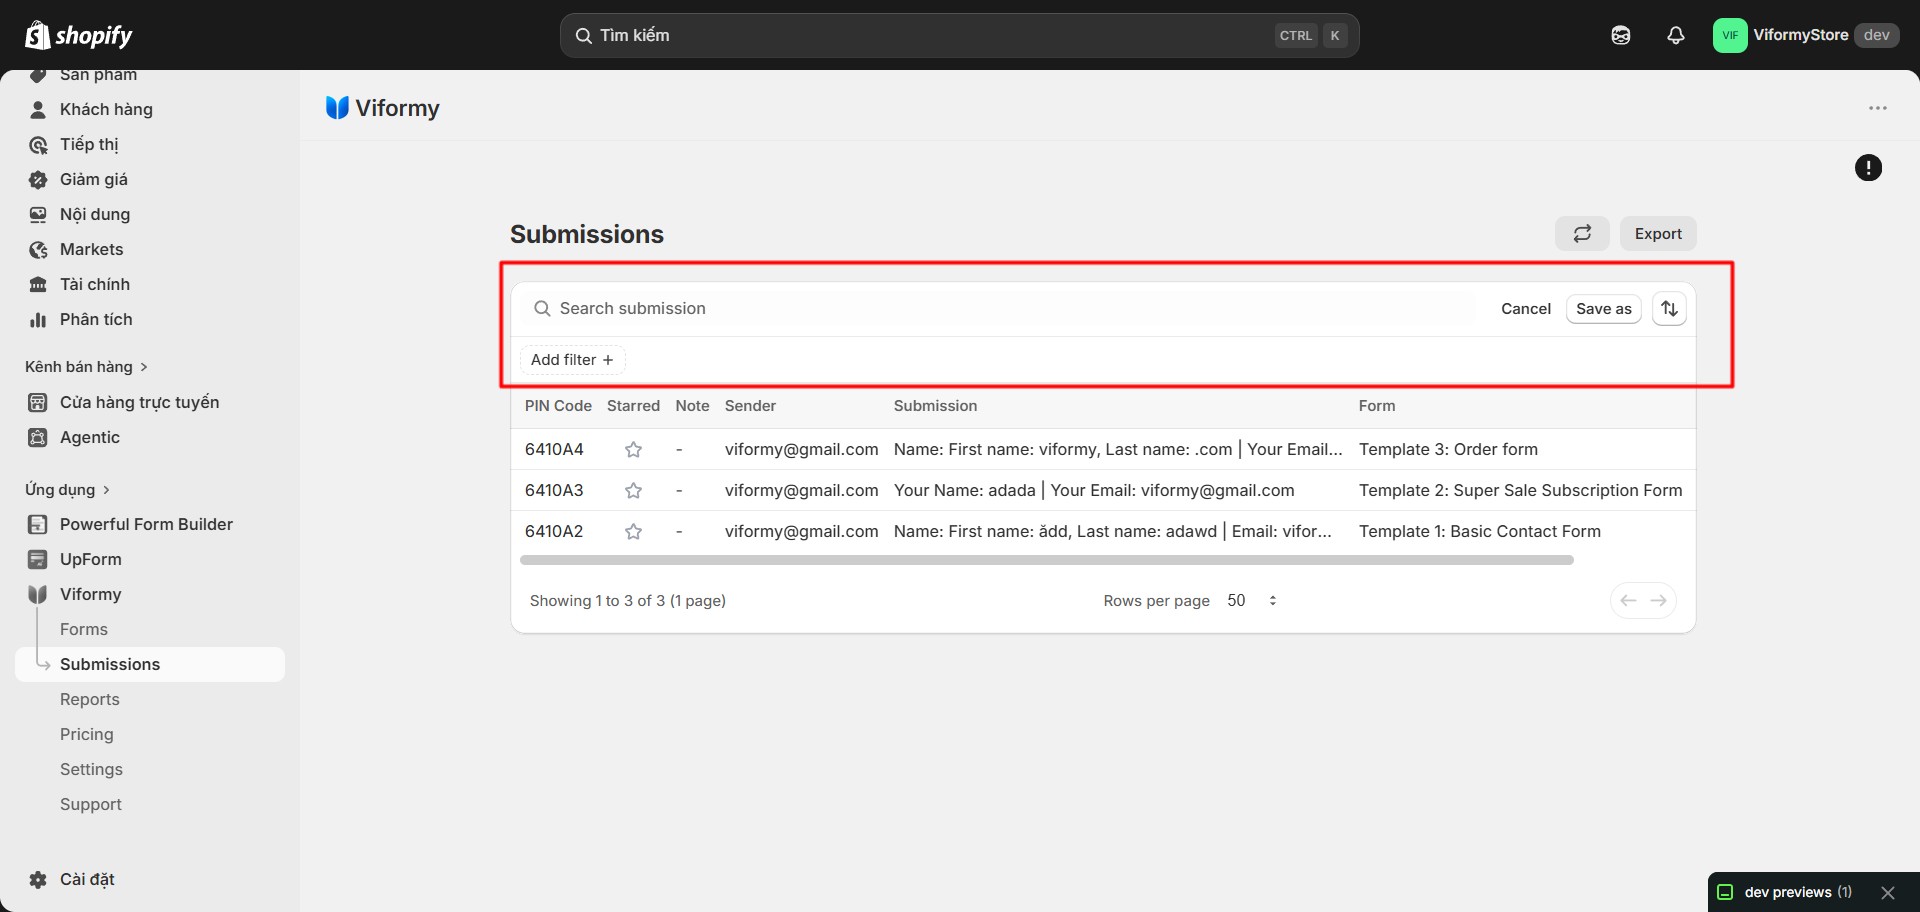
Go to the Viformy app in Shopify Admin, then open the Submissions page.

The Submissions page shows all saved submissions for your store. Newer submissions are shown first by default.

The submission table can include columns such as:

  • PIN Code: A short code generated for the submission.
  • Starred: Mark important submissions.
  • Note: Internal note added by your team.
  • Sender: Customer email or name detected from the submission.
  • Submission: A short preview of submitted field values.
  • Form: The form that received the submission.
  • Date: When the submission was received.
check sum 2

Step 2: Search Submission Data #

Use the search box to quickly find a submission.

You can search by:

  • Submission ID
  • Sender email or name
  • Form title
  • Submitted field values

check sum 3

Step 3: Filter and Sort Submissions #

Use filters to narrow down the submission list.

Available filters include:

  • Starred: Show starred or unstarred submissions.
  • Form: Show submissions from selected forms.
  • Created: Filter by Today, Last 7 days, Last 30 days, Last 90 days, Last 12 months, or a custom date range.
  • Tags: Show submissions with selected tags.
  • Verified email: Show submissions with or without verified email status.
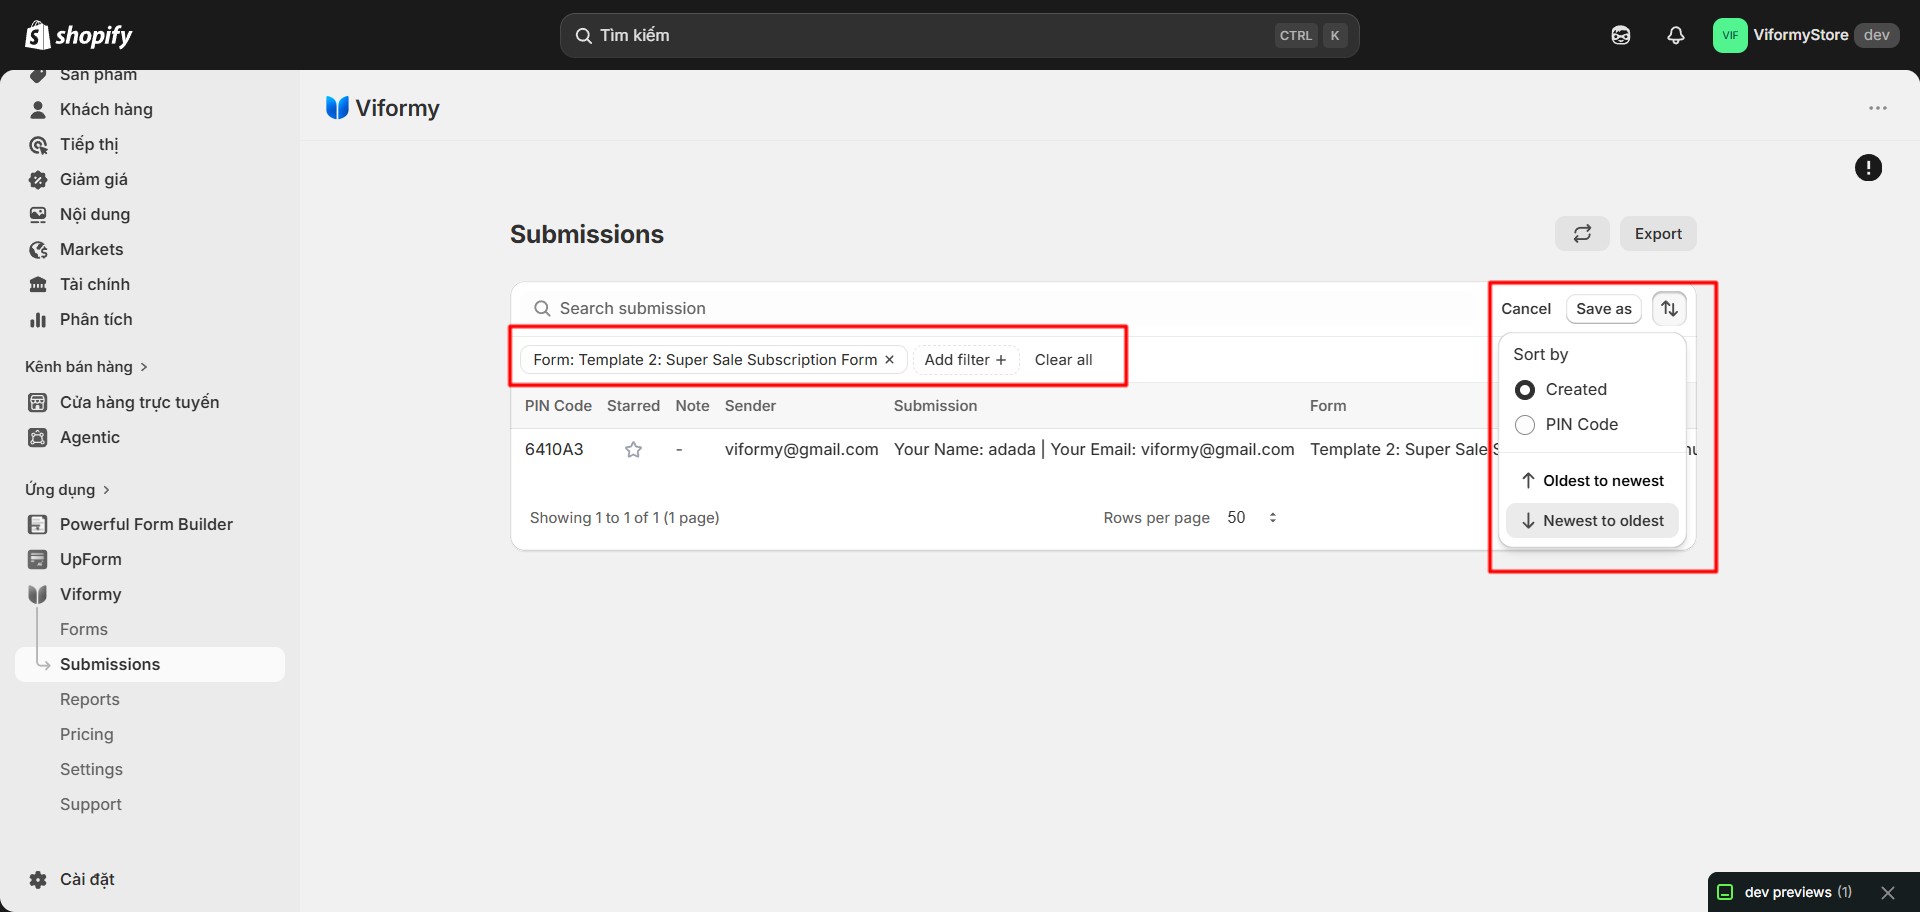
You can also sort submissions by created date or PIN code.

check sum 4

Step 4: Customize the Submission Table #
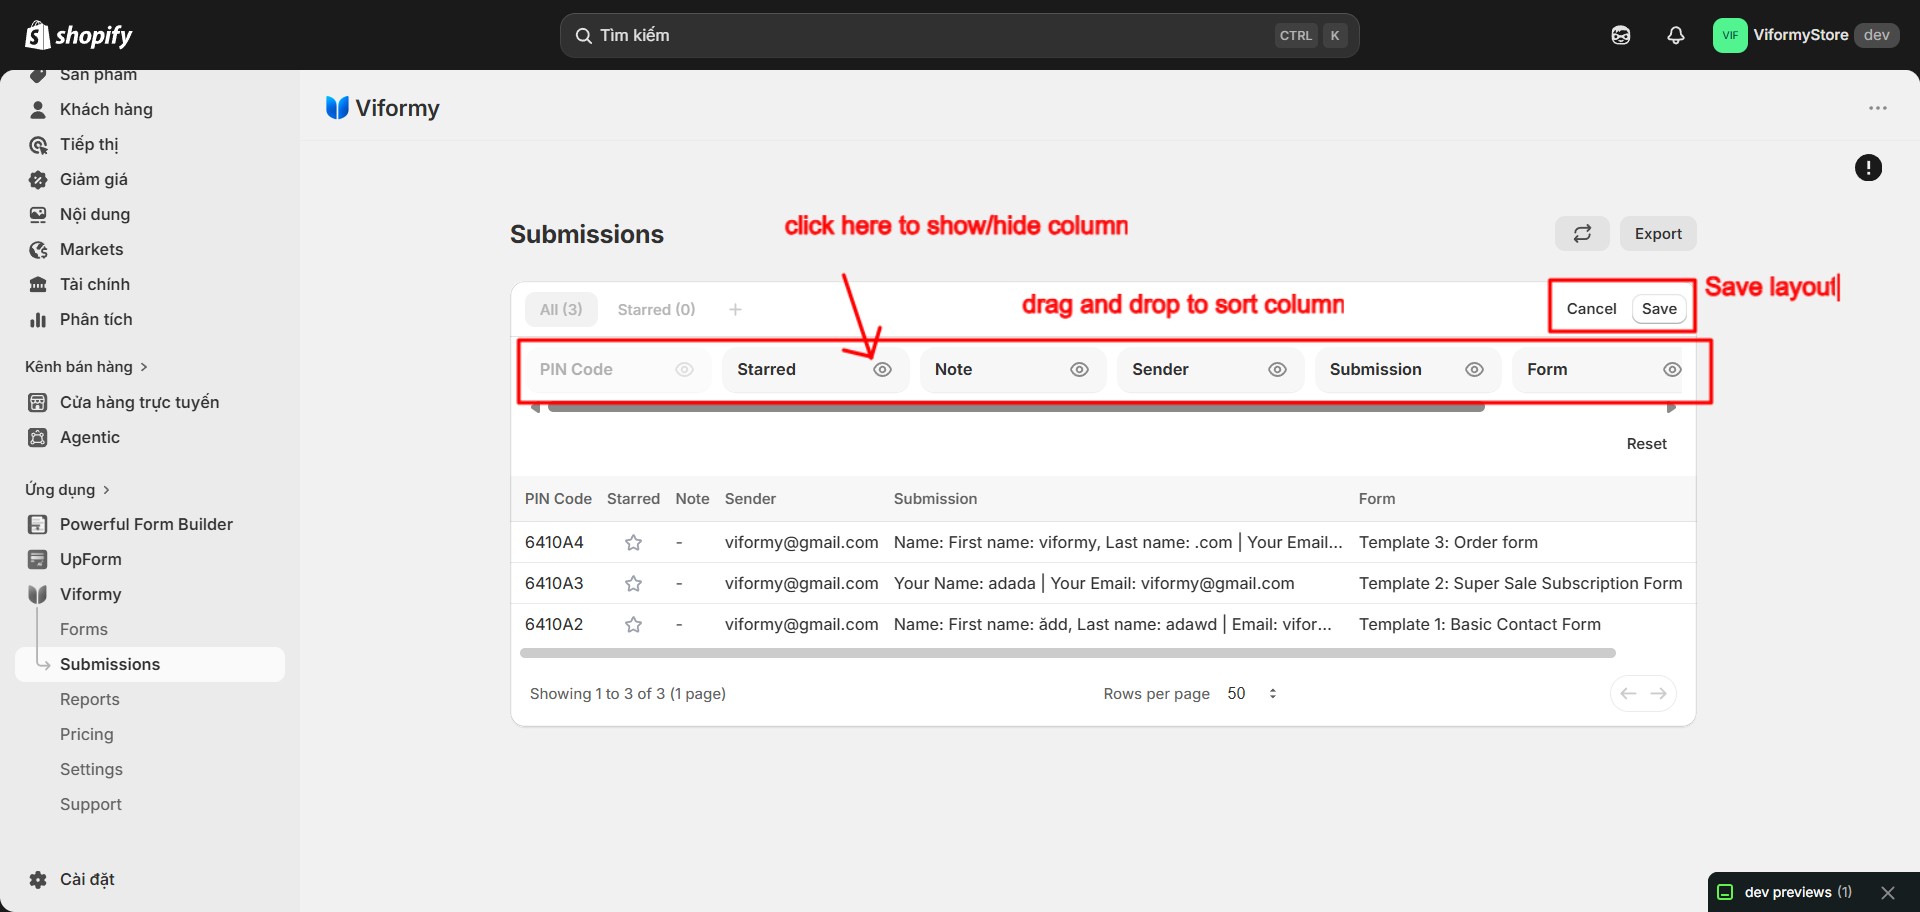
Click the column layout button to customize which columns are shown in the submission table.

You can show, hide, and reorder columns, then click Save layout. The saved layout is stored for your current shop.

check sum 5

Step 5: Open a Submission Detail #

Click a submission row to open the submission detail page.

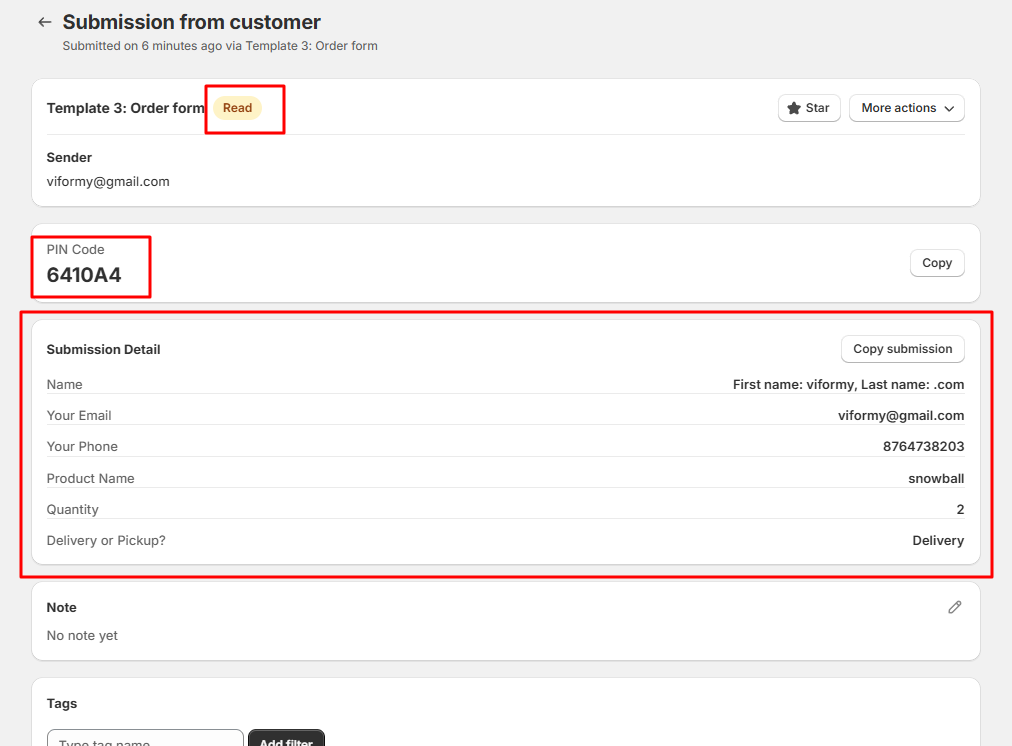
When a new submission is opened, Viformy marks it as read automatically. You can also manually mark it as read or unread from the More actions menu.

The detail page can show:

  • Form title
  • Submission status, such as Unread or Read
  • Sender
  • PIN Code
  • Submitted field values
  • Uploaded files, if the form includes file upload fields
check sum 6

Step 6: Copy PIN Code or Submission Data #

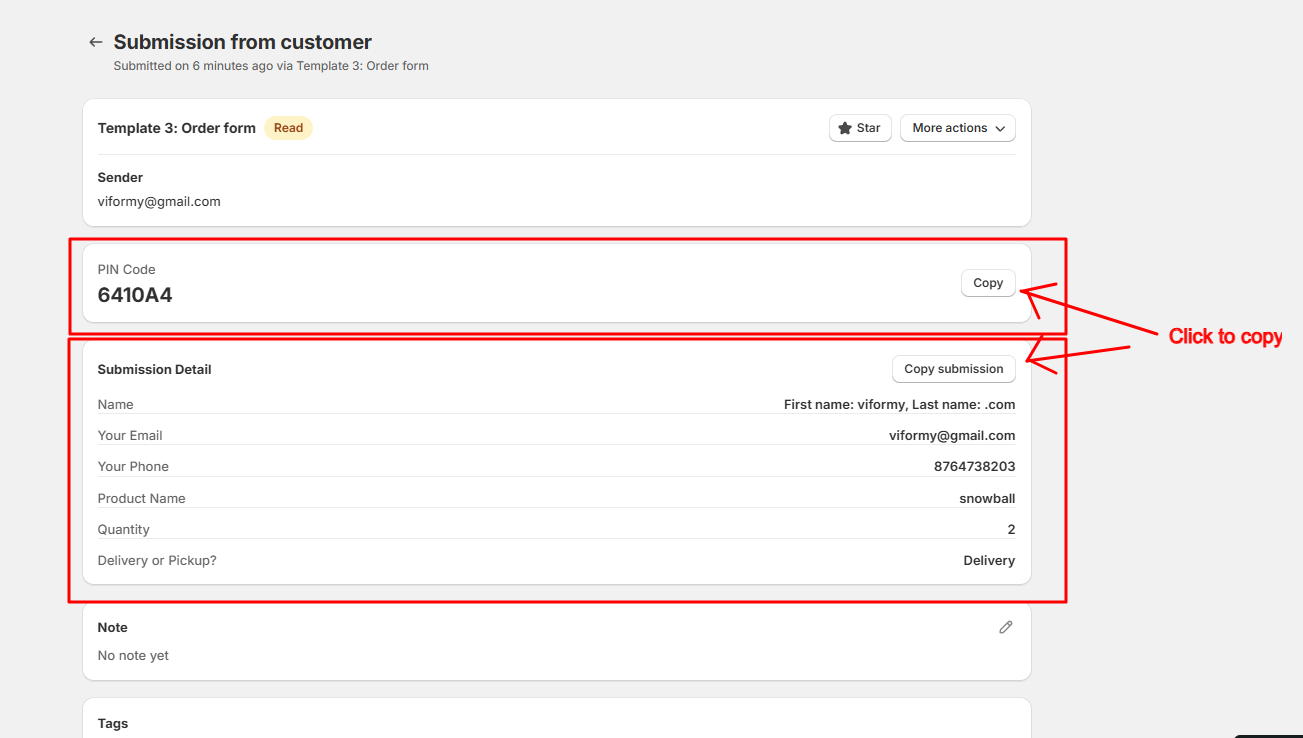
On the submission detail page, you can copy the PIN code or copy the submitted field values.

  • Copy PIN Code: Copies the short submission code.
  • Copy submission: Copies submitted field labels and values as text.
check sum 7

Step 7: Add Notes and Tags #

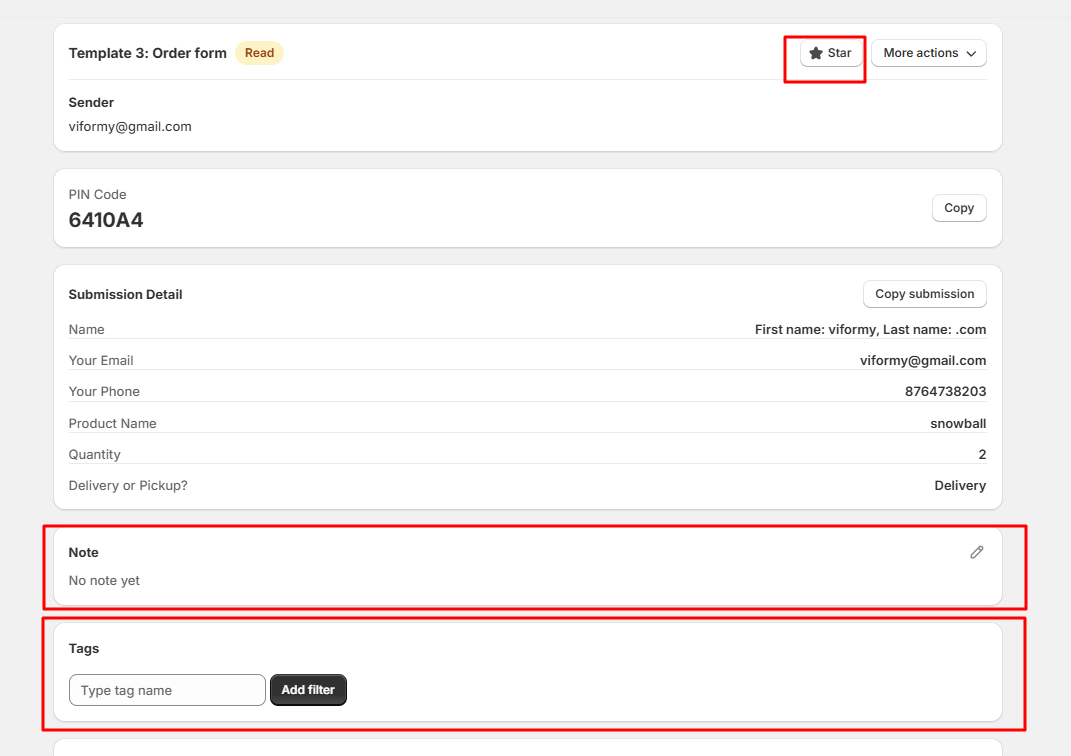
Use notes and tags to organize submissions internally.

  • Note: Add an internal note for your team.
  • Tags: Add labels to group or filter submissions later.
  • Star: Mark important submissions for quick access.
check sum 8

Step 8: Check Submission Information #

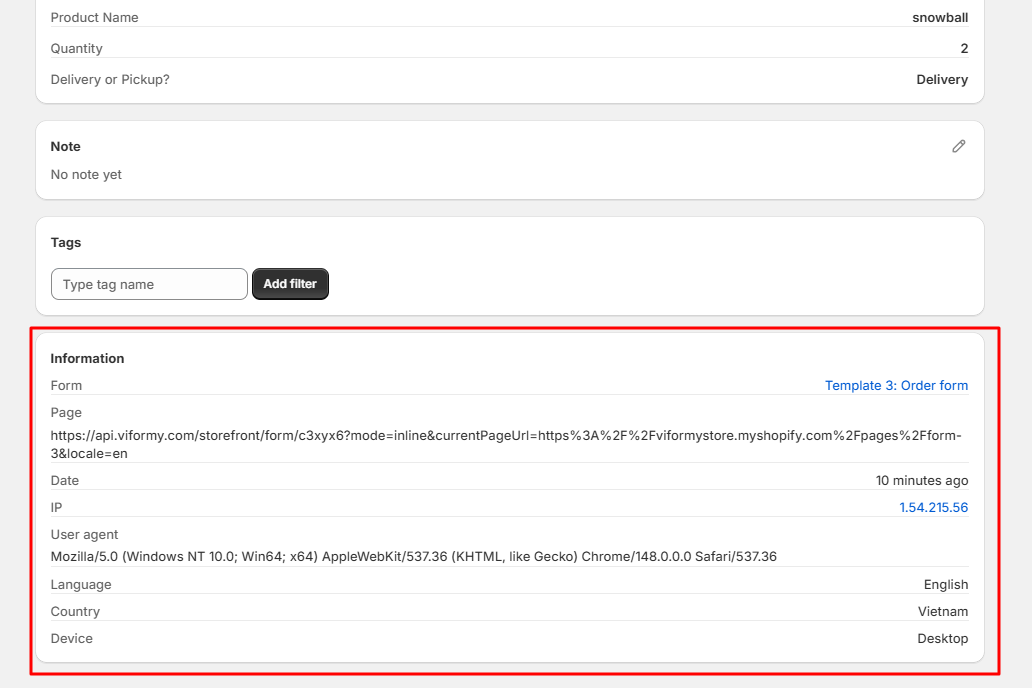
The Information section gives additional context about where and how the submission was created.

It may include:

  • Form
  • Page
  • Date
  • IP address
  • User agent
  • Language
  • Country
  • Device

check sum 9

Step 9: Download Uploaded Files #

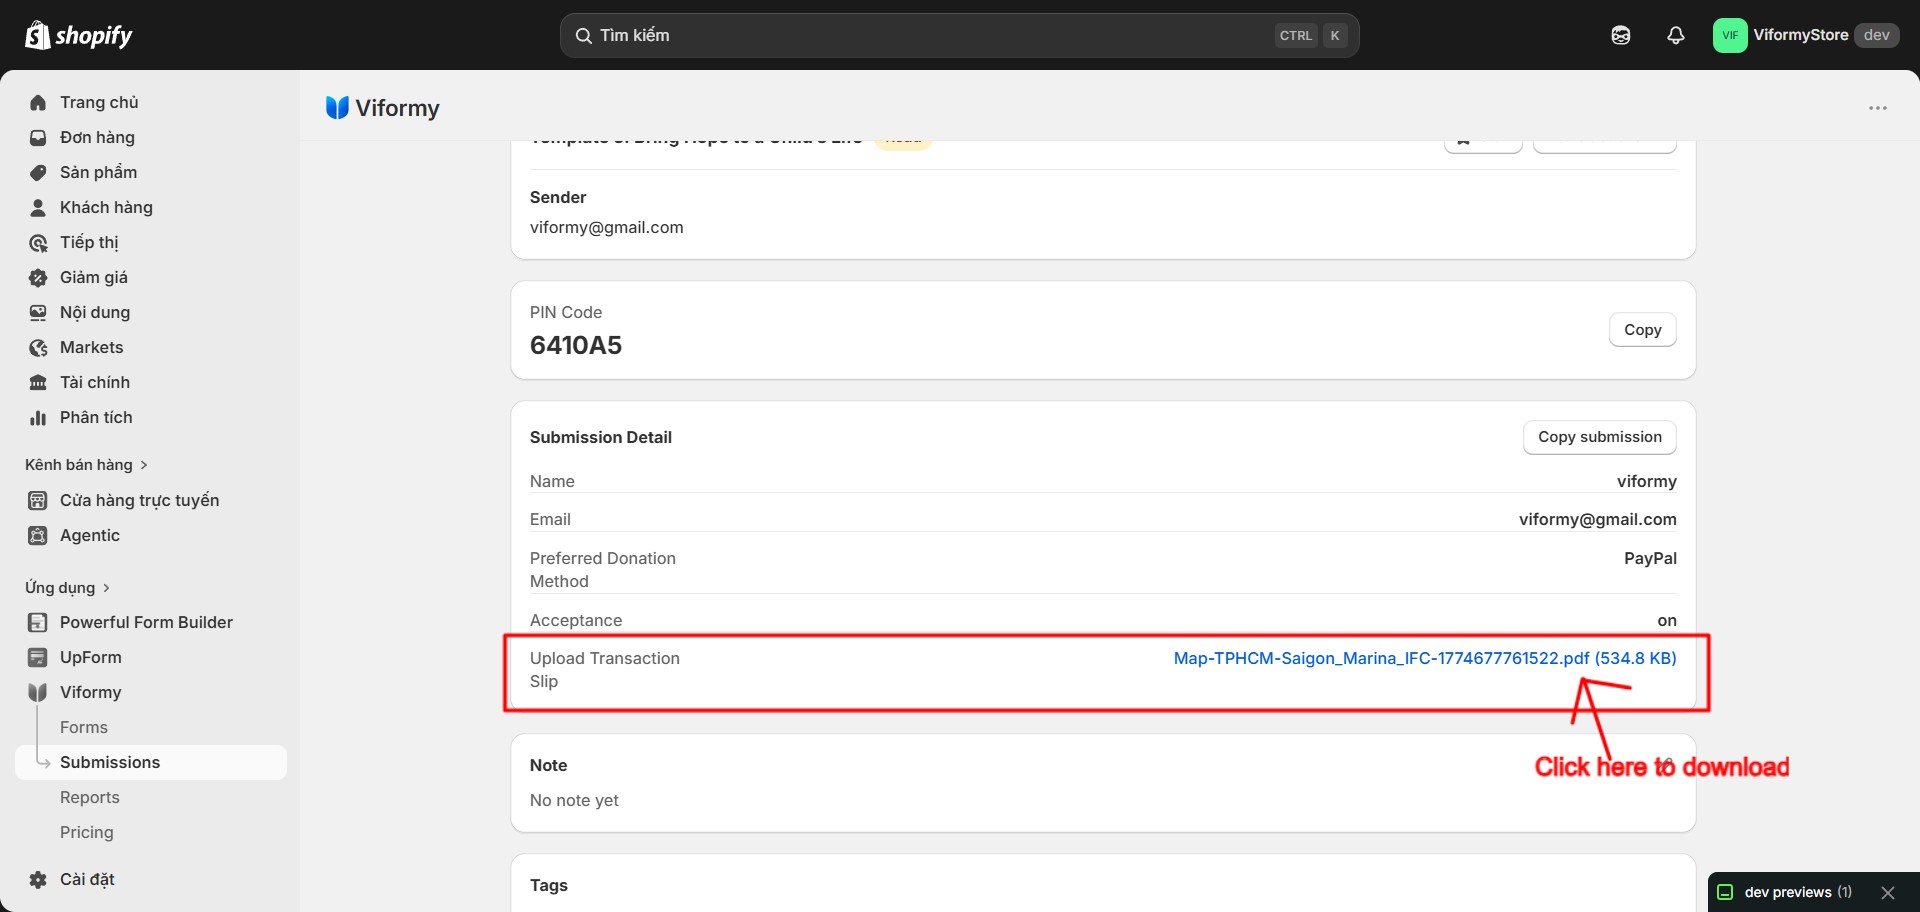
If the form includes a file upload field, uploaded files can appear in the submission detail. Click the file name to download it.

Viformy resolves stored file information and downloads the file through the storage download API.

check sum 10

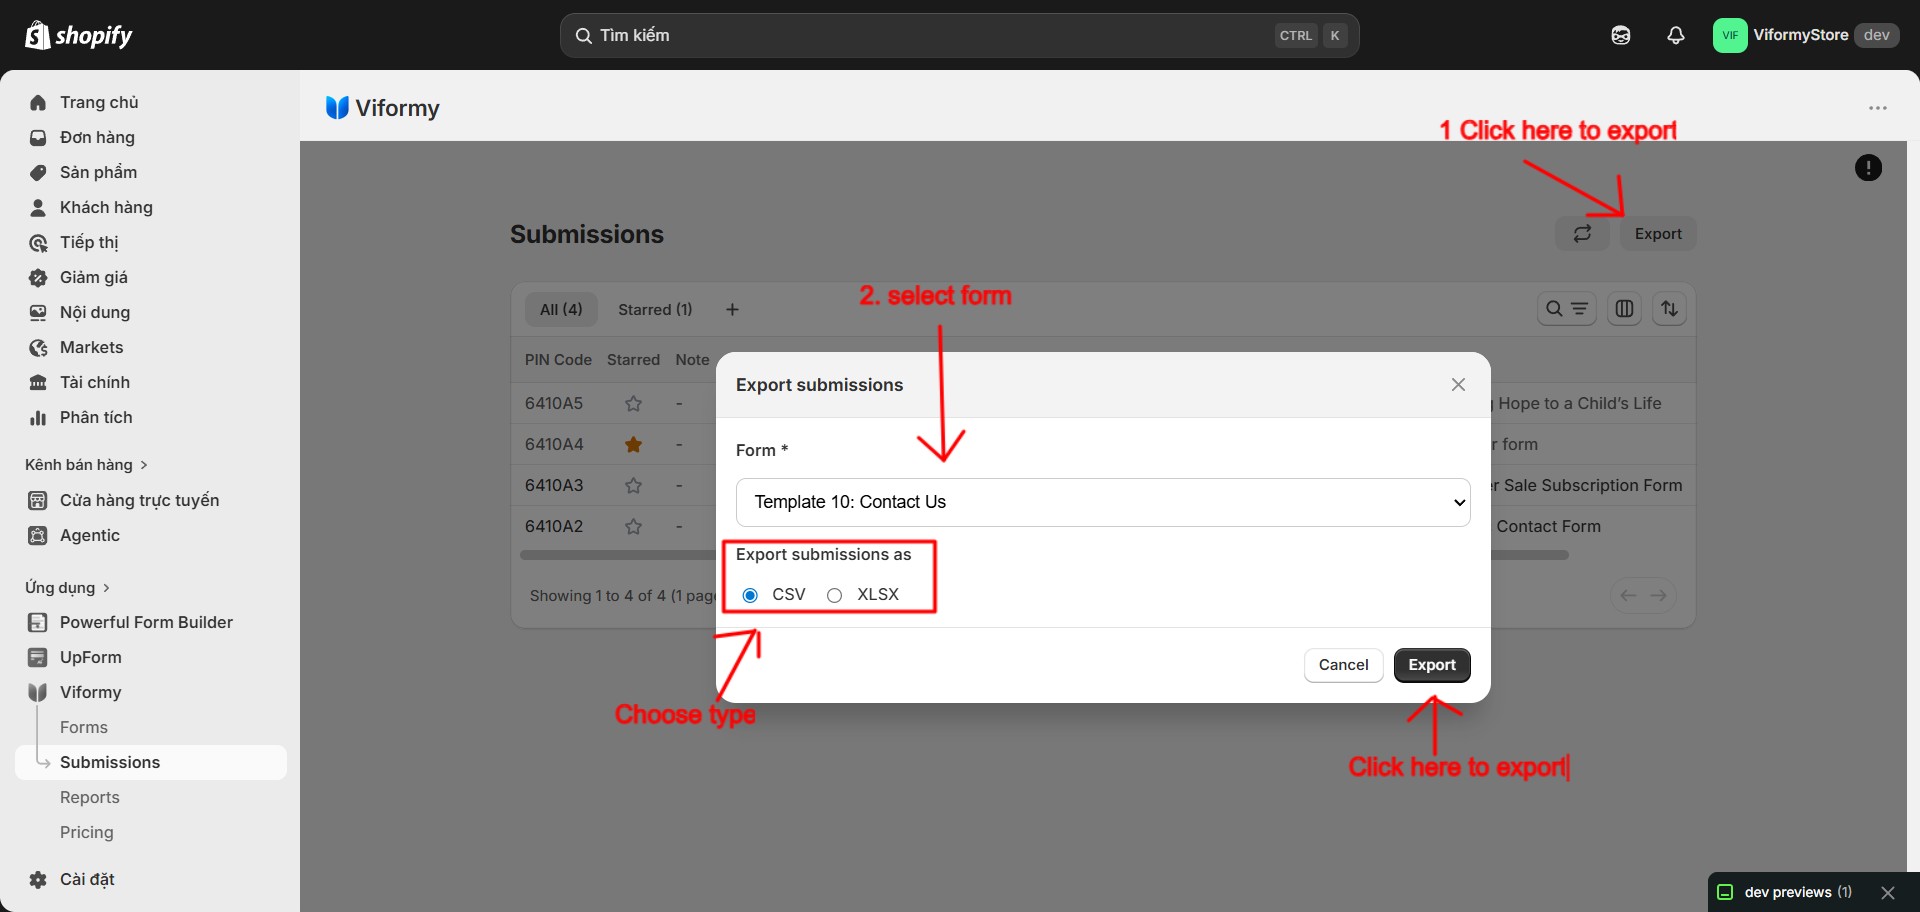
Step 10: Export Submissions #

Click Export on the Submissions page to export submission data.

In the export modal, select a form and choose the export type:

  • CSV
  • Excel

The exported file includes fields such as PIN Code, Starred, Sender, Form, Submission, Date, Note, and Status.


check sum 11

Step 11: Delete a Submission #

To delete a submission, open the submission detail page, click More actions, then choose Delete submission.

Viformy will show a confirmation modal before deleting the submission.

Warning: Deleting a submission cannot be undone.

Common Cases #

No submissions are shown

Check whether the form has received submissions and make sure Save submission data is enabled in the form Settings tab.

Search or filters show no results

Clear the search term or filters, then try again. You can also click the reload button to refresh the submission list.

Sender shows Unknown

Viformy tries to detect the sender from email fields, name fields, or stored sender values. If the form does not collect name or email information, the sender may show as Unknown.

Uploaded file is not visible

Make sure the form contains an upload field and the customer uploaded a valid file. If file metadata is missing, Viformy attempts to resolve stored file information from the saved submission data.

Quick Workflow #

  • Enable Save submission data in the form Settings tab.
  • Open Submissions in the Viformy app.
  • Search, filter, or sort the submission list.
  • Click a submission row to view full details.
  • Add notes, tags, or star important submissions.
  • Export submissions as CSV or Excel when needed.
Updated on May 27, 2026

What are your Feelings

  • Happy
  • Normal
  • Sad

Share This Article :

  • Facebook
  • X
  • LinkedIn
  • Pinterest
Disable saving submission data for formsView Insight of the Form
ON THIS PAGE
  • How to Check Submission Data in Viformy
  • Before You Start
  • Step 1: Open the Submissions Page
  • Step 2: Search Submission Data
  • Step 3: Filter and Sort Submissions
  • Step 4: Customize the Submission Table
  • Step 5: Open a Submission Detail
  • Step 6: Copy PIN Code or Submission Data
  • Step 7: Add Notes and Tags
  • Step 8: Check Submission Information
  • Step 9: Download Uploaded Files
  • Step 10: Export Submissions
  • Step 11: Delete a Submission
  • Common Cases
  • Quick Workflow

The most powerful and flexible form building solution for Shopify merchants.

Product

  • Features
  • Integrations
  • Pricing

Support

  • Documentation
  • Help Center
  • API Reference

Legal

  • Privacy Policy
  • Terms of Service